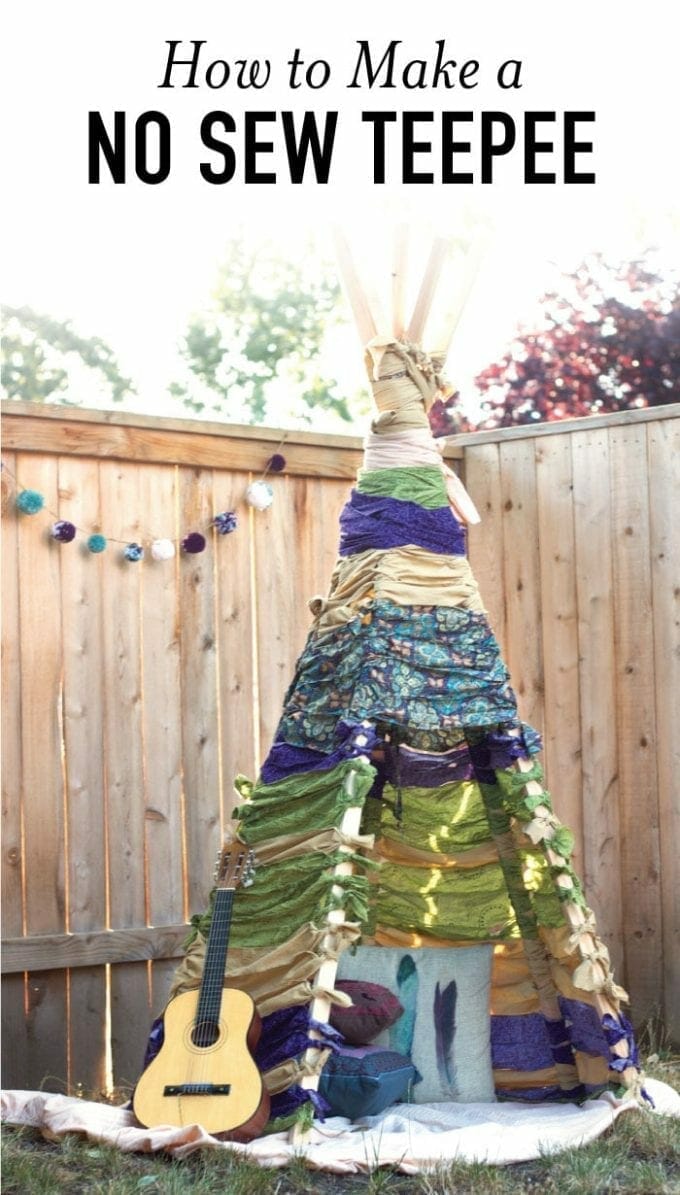
Build this no sew teepee that is perfect for forts, reading in the shade outside, or just for some fun imagination play. Make this easy DIY using this tutorial.
I am excited to introduce you to my good friend, Erin, who is joining us today! She is so creative and her home is darling. We actually were pregnant at the same time and due the exact same day. Lucky for her, her little one came 11 days early while I sat around sulking until Clara made an appearance five days late. A few months ago she posted a no-sew teepee she built for her boys on Instagram and I knew she needed to share it with you all. So take it away, Erin!
Oh man! I’m so excited to be here. Burlap and Babies is one of my favorite DIY/Mommy blogs so when Amanda asked me to be a guest contributor, of course I said YES! I’m Erin, a stay-at-home mommy of two boys and we are always looking for new ways to keep busy and inflate our little imaginations.
I needed to make an easy, no-sew teepee. Can you imagine the possibilities? We could use it inside for reading and hiding toys from little brother, or outside as a refuge for when our grass turns into the ocean and sharks take over. Oh NO!!! This teepee is so cute and totally worth the time. It took me about two days total (off and on, of course), but you could definitely do it in a weekend.
OK, here we go! Oh, some of the pictures are poor quality and my house is a mess. I took them on my iphone at night, inside, with bad light. I didn’t know I would be sharing them with y’all.
Here’s what you’ll need…
SUPPLIES
6 qty 1x2s x8′ long (cheap pine boards from Home Depot, used as the support poles)
jute or hemp
fabric*
TOOLS
Hot glue gun and glue sticks
Drill
Hand saw (or something fancier)
Scissors
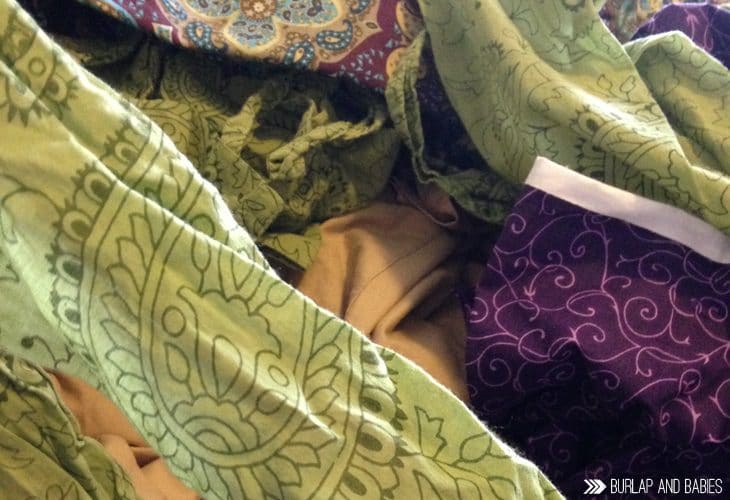
*For the fabric I used 2 old curtains I had and an old queen size flat sheet. You can use whatever you want. There is no length requirement as you can tie pieces together (it makes it look more authentic).
INSTRUCTIONS
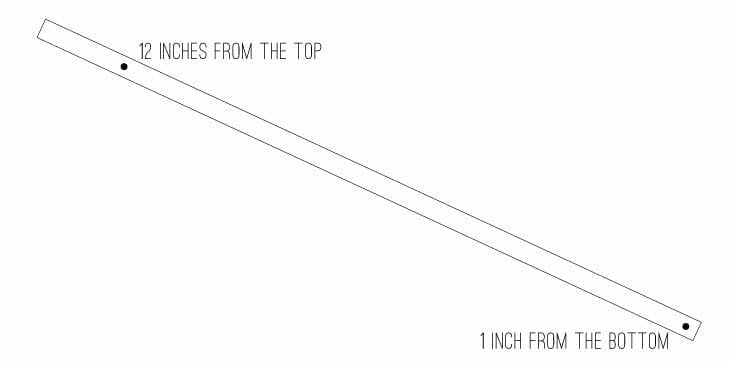
1. Take your poles and decide what length you want it. We cut ours down to 6′ 6″. We have 8′ ceilings.
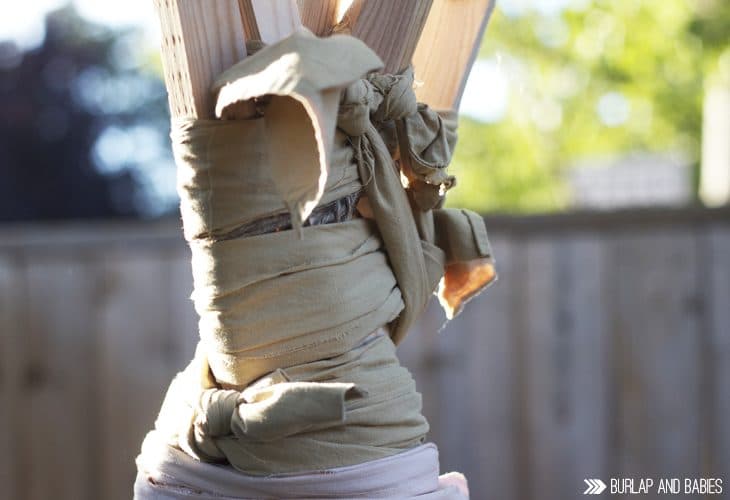
2. Line your cut poles in a row and mark a spot to drill about 12″ from the top and another one about an inch from the bottom, right in the middle of the 2″ wide side. Do this on all 6 pieces. Drill your holes. The holes need to be big enough for the hemp to fit through. Use this hi-tech blue print as a guide.
3. Now you should have 6 poles with 2 holes each. Grab another set of hands as this step requires 2 people. With the 12″ down holes on the top, take all of the poles, hold together and sort of manipulate into position. There is no right way to do this so if you have a better way, DO IT! Just remember that you want the “entrance” side to be wider than the other sides.
4. Once you have your general position, have one person hold the poles while the other person strings the hemp through all the top holes. Continue to just wrap the hemp around the poles until secure and tie off.
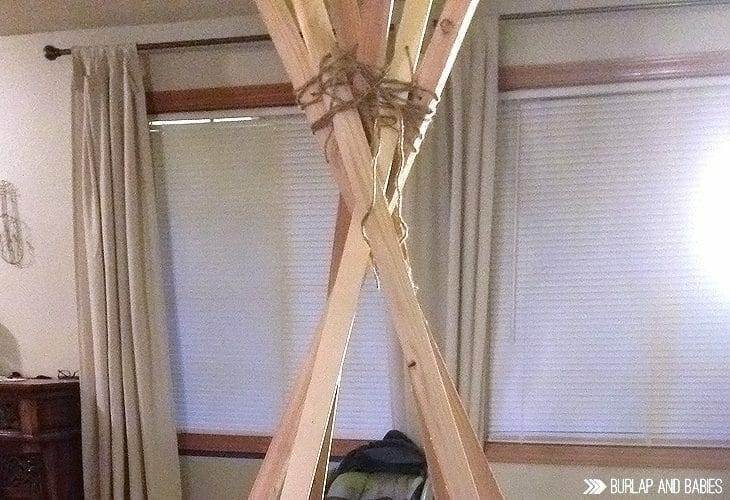
5. String a piece of hemp through the holes at the bottom. Tie off at each end. What I mean by this is tie a large enough knot on each side of the pole to “lock” it in position. This will just keep its general shape as you take it down and set it up, over and over.
6. Now get out the boom box and put some tunes on. I think this project calls for Janis Joplin and Stevie Nicks.
7. Take your chosen fabric and start to cut strips. I actually ripped mine. It looks more shabby. You can do any width really, I did about 5″-6″. The wider you do them, the less weaving you have to do. Don’t worry about length, you will tie pieces together if they’re not long enough.
8. Start at the top with a strip and just wrap, wrap, wrap around the top. I went about a foot down the teepee. Secure with glue gun. This is to visually cover the hemp and the help secure the top (but keep it a flexible joint).
9. Now tie a strip of fabric onto a pole and begin loosely weaving your strips. I did over-under, over-under. If you run out of length, just tie another strip onto the one you’re using. You can switch up fabrics if you want to. I did this weaving down about another foot. Next, you’ll hot glue the strips together (the bottom of one strip to the top of the strip below it).

10. Continue tying and weaving strips but start to make an opening for the entrance. Every foot or so you get down the pole, stop to glue the strips together (step 9). Keep weaving and gluing until you’re done!
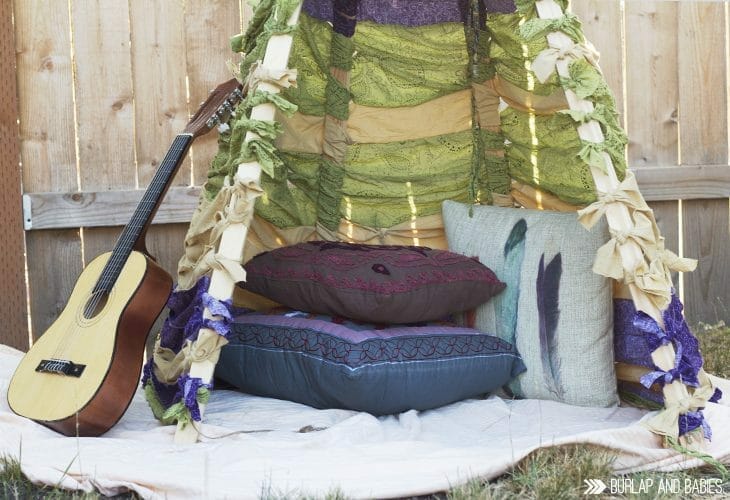
The teepee will sort of collapse into itself for easy storage. But, it’s so cute, you’ll want to just keep it up! The great thing about this is each teepee will look a little different. As you do it, you’ll get into the groove and you may even change things up. That’s the beauty!
I would love to see your teepee! Share them on Instagram and use #pdxteepee. Thanks for having me!
Thanks so much, Erin, for sharing this no sew teepee!
Friends, if you love it just as much as I do leave some comment love for Erin to let her know! Erin now has her own blog at CleverBloom.com. Be sure to check her out and follow her for more creative DIY inspiration!

I am all about no-sew and this is genius. Love it. Sharing on Pinterest and with my librarian buddies. Would be precious in a library for a reading space. Thank you!
Love, love love! Can’t wait to get started on Lyla’s. I already have some fabric to start, tools, glue and jute. Just need the sticks and more fabric. So excited! Thanks for sharing ladies :O)
Little coves and nooks for the kids are great. We just did a playhouse outside, but this is a great idea for something inside during winter! My husband and I are in process of cleaning out all our old t-shirts from our closet. I wonder if we could use our old t-shirts instead of fabric to make something like this. Hhhmm. I am always attempting to think of ways to repurpose our old clothes.
Thanks for a great idea and project!
This is so great! I love that it is no sew and the fabric is adorable. Thanks for sharing!
This is seriously SO amazing!! I’m totally pinning this and saving it to make for Jade one of these days. :)
I love, love, LOVE this!! I can see my daughter (heck – ME!) spending hours in there reading & relaxing! Pinned & shared!
Yes me too! Maybe I can take my coloring books and go color in the teepee. :)
I love this teepee! Pinned. Amanda – After I shared through your shareaholic buttons, I tried to click through the G+ follow button and it gave me an error. Your link is incorrect. Following on bloglovin. :)
I love this!!! I’ve been looking for the best teepee tutorial for my one-year-olds playroom and this is it! I love the artsy look of it. I already have our poles up with a large sheet pinned over it because I’m impatient and wanted to get it up, but I plan to go to goodwill soon and find some old sheets to use for the fabric to do this tutorial. I’m very excited to see the finished product. Thank you very much for sharing this idea! :)