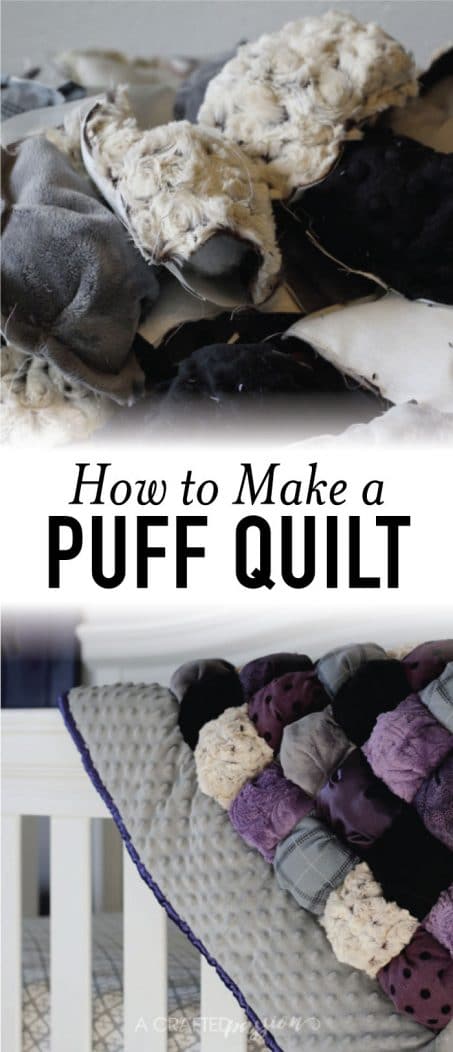
Also known as a biscuit quilt, this DIY puff baby quilt is perfect for even a beginner to make and is so cute for a baby’s nursery! This easy sewing project is a great baby shower gift or birthday present for a new baby and can be easily customized for a boy or girl.
Have you ever made a quilt? The whole concept intimidated me, but three years ago I decided I wanted to learn to sew and I wanted to do it before I had babies. I had seen a puff quilt online and fell in love in an instant! I thought it would be easy to learn how to make a puff quilt and although it’s not a traditional quilt, I love how it turned out!!
AND it was way easier than I expected! If this total sewing newbie can figure it out, you can too! Also known as a biscuit quilt, this easy quilt is perfect for even a beginner to make and so cute! They make a great baby shower gift, Christmas present, or birthday present for a new baby.
How to Make a Puff Baby Quilt
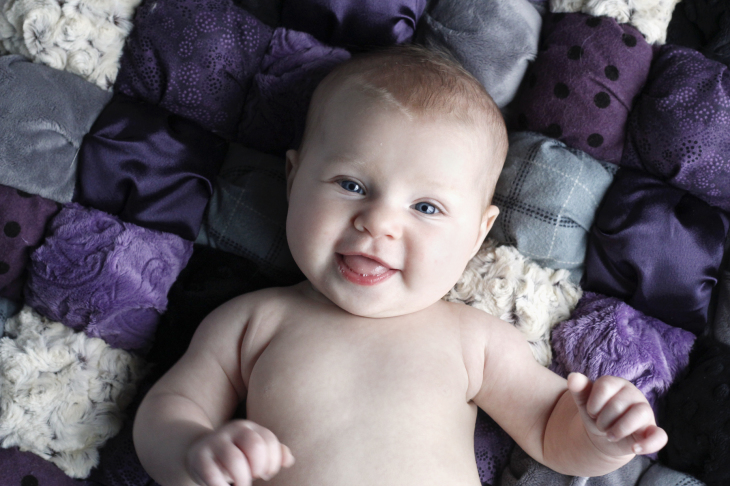
First, I started by buying 8 complementary fabrics of different textures. I knew I wanted to make a fun quilt for my future baby and since my husband had already decided we were going to have a purple and gray nursery for a future baby girl one day, it made it easy.
This quilt is so easy to make, anyone can do it. So here we go. Let’s start with what materials you will need.
What you need:
- 1/3 yd of 8 types of fabrics – having different textures makes the puff quilt fun for babies to play with
- 1.5 yd of cotton-woven scrap fabric – Don’t use anything fancy here. I cut up an old sheet I had and it worked great!
- Batting
- 1.5 yds of material for the back and edge
- 1/4 yd of satin ribbon for edging
- Wonder clips – These are seriously amazing and are key to making you not pull out your hair keeping the two pieces of fabric together while seaming your squares together. They also have markings on the flat part of the clip to show you how far your seam allowance is. Plus, they don’t put pin holes in your fabric! Definitely, grab these before you start any sewing project!
Instructions
1 | Cut Squares
Start by cutting all your squares out. Cut your cotton woven fabric into 4-inch squares. I made an 8 by 10 square quilt so you’ll need 80 squares. Honestly, grab any fabric you have on hand. I used an old sheet and some pillow cases. Then, take your fabrics for the top and cut the fabric into 5-inch squares. You will need 10 squares of each.
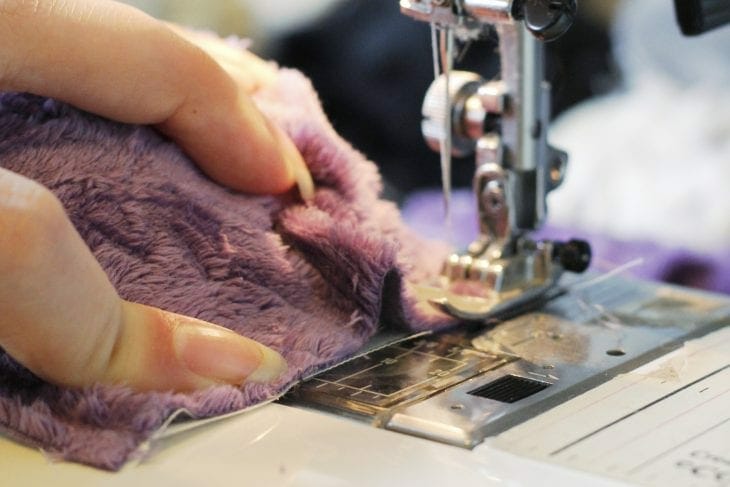
2 | Sew Squares
Once all your squares are cut, line up the corners of your cheap fabric and top fabric and start sewing about a 1/4 inch in. Now, this is one of the nice things about doing this type of quilt as a beginner quilt. It’s super forgiving! Don’t worry about this step too much.
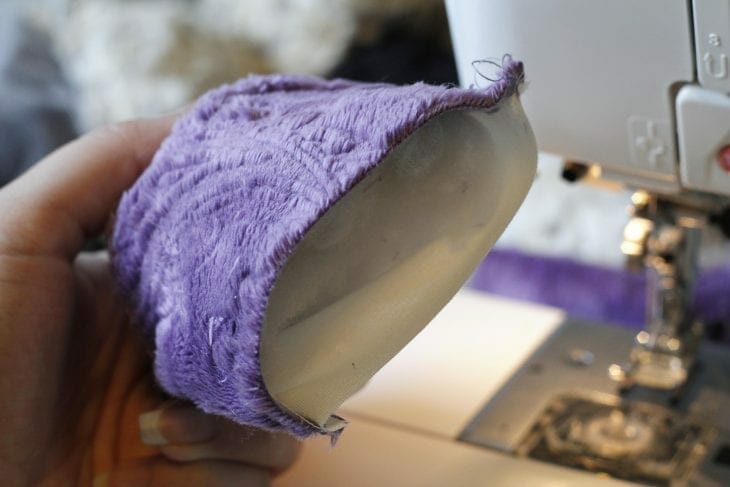
Once you’ve sewn a little bit in, line up the next corner. Since your top fabric is larger than the bottom then you’ll have excess fabric. Fold this over to create a pleat (as shown below). Work your way around the square lining up the corners and creating the pleats in the middle of each edge on three of the four sides.
If your sewing machine encounters any issues during this process, seeking assistance from a professional sewing machine mechanic is crucial. A malfunctioning machine can hinder your project’s progress. If you’re currently facing difficulties, don’t hesitate to reach out for expert help!
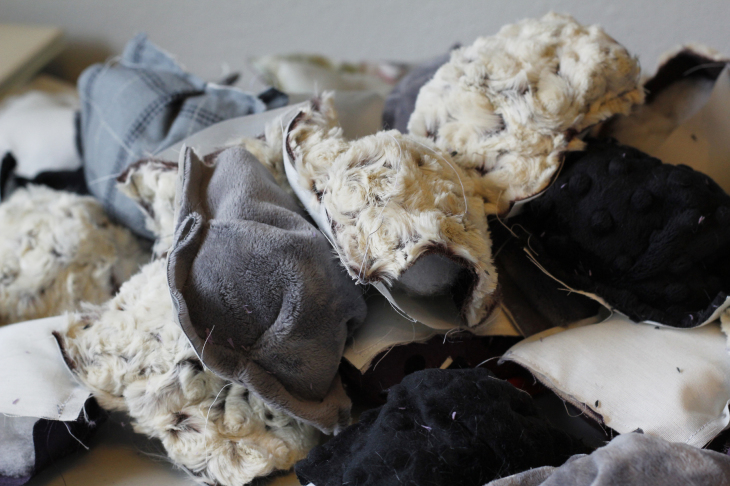
3 | Stuff Squares
Once all your squares are sewn, take your batting and start stuffing all your squares. This is personal preference on how full you want the squares to be. I wanted them filled but not too full that they weren’t flexible.
4 | Sew Open Edge
Next, sew up each open edge. Again, making sure to pleat it in the middle.
Now is the fun part!
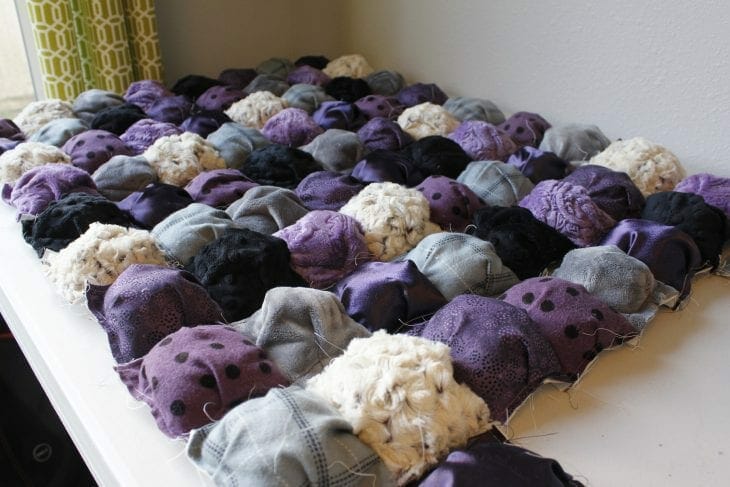
5 | Create a Pattern
Take all your squares and create the pattern for your quilt. I wanted mine to look random with no two like fabrics touching each other. Other people have made obvious patterns or designs with their pattern. Google puff quilt to see some examples or download the free pattern examples I’ve provided below.
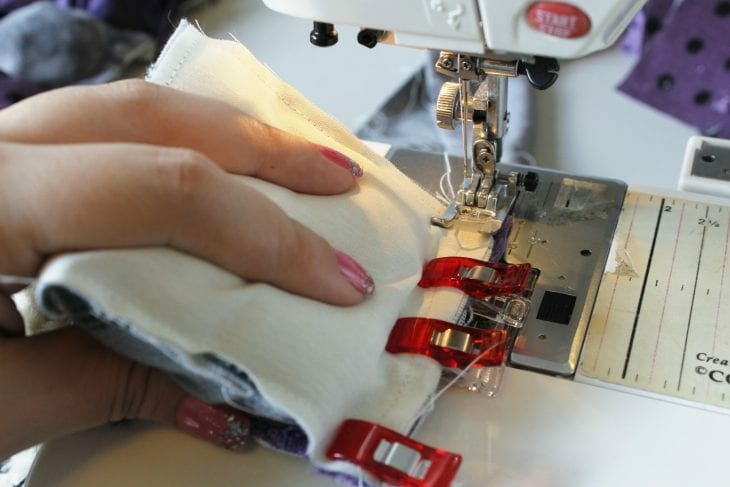
6 | Sew Rows
Once you have your quilt lined up you can sew it all together. Start in one corner of your quilt and put the two squares with right sides together. Now, sew them together making sure your seam is in far enough to cover your first seams creating the square. Keep doing this until you have all your rows.
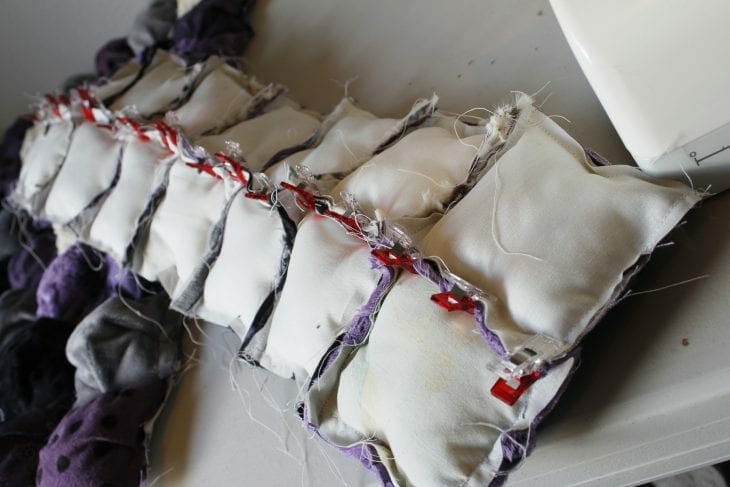
7 | Sew into Quilt
Then take your rows and clip (or pin) them all together and sew all the rows together. I found these wonder clips work way better than pinning. This is the hardest part of the whole process but believe me, once you’re done with this step you’ll definitely see the light at the end of the tunnel.
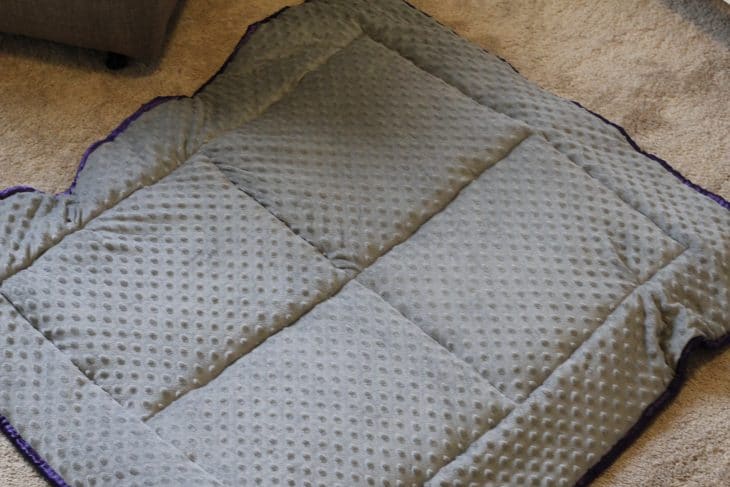
8 | Backing & Edge
Lastly, you’ll need to finish off your quilt. I chose to put a layer of batting to make my quilt thicker and then used the same gray minky as my edge on the front and to cover the whole back. Of course, you could choose different fabrics for this if you want.
Honestly, I was technically in labor when my mom and I were finishing this quilt except I didn’t know it. So these next steps are a little blurry. This quilt got finished about 8 pm Monday night and baby Clara was born at 5:12 the next morning. Silly me apparently didn’t realize what labor was. But boy was I determined to finish that quilt before she came! Thanks mom for making it possible!
So, we cut 6-inch strips of the minky to use for the front edge. This got sewn onto the edge of the rows that were already sewn together. Then lay this piece on top of your batting and cut your batting down to size. Lastly, cut minky to fit onto the back of your quilt. If you’re concerned about the batting slipping with use, sew a line down the center of your quilt all the way through all the fabric to hold it in place.
9 | Edging
Then add a satin edging. I couldn’t find the perfect ribbon to do it so bought some satin fabric and cut it into 2-inch strips. Then, sew the raw edges of your edging and quilt together, fold over the edge, and hand stitch the folded side of your ribbon onto the back.

And there you have it! A stunning puff quilt that will surely impress your friends…or at least your husband and hopefully the baby. Besides, it’s so soft and cuddly! I know my little munchkin loves hanging out on her puff quilt. We’ve dubbed it her supervised play mat since it’s too heavy to go on top of her, but I love how it turned out.
You could choose to not add the batting and then it wouldn’t be so heavy. It’s going to be a great quilt for her when she is older though and I couldn’t be more happy with how it turned out!
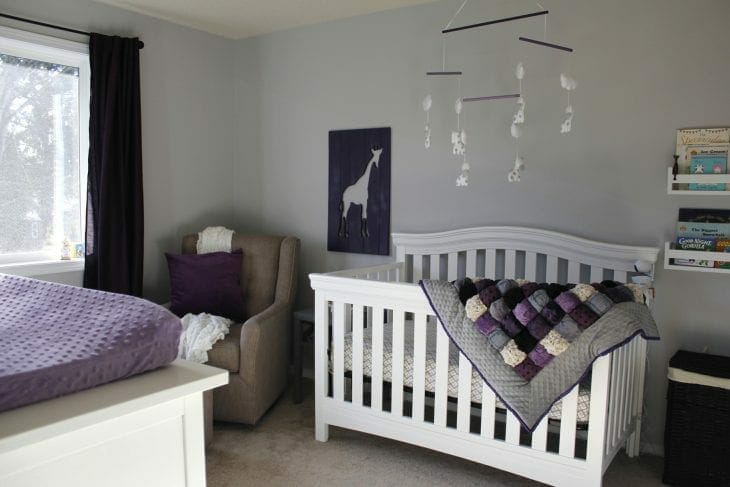
Related: You can see Clara’s puff quilt in her new toddler bedroom here. It makes the perfect comforter for her now!

Now, it’s your turn! Who in your life do you want to make a puff baby quilt for?
You can see all of Clara’s nursery reveal here.

is it washer machine safe?
Hi Rachael! It depends on what type of fabric you use. As long as you don’t use silk, it should be fine. Because of the stitching through the back it should hold everything in place.
Thanks that was a great tutorial. My grandmother would make these puff or she called it (Biscuit Quilts ) (We re from the south !).Grandma made hers in the late 60 s and 70 s with all kinds of different materials. I couldn’t t remember exactly how she did it. I was a disinterested tween ! Thanks your tutorial made sense to me. Congrats on the beautiful baby girl.Happy New Mommy s day !
Oh how fun! Thanks Alicia. Would love to see it if you end up making one. They really are so easy to make and turn out so fun! :)
Great tutorial :)
I’m just wondering about the weight of the final project. Would it be less weighty without the additional batting you sewed in as the backing? Or is it also the kind of fabric you used?
– Krys
I love the baby puff quilt. I love it so much that I want to make one for my king size bed. Do you think that would be a project a beginner could handle? By beginner I mean I never have tackled a quilt.
I am in the process of making this puff quilt, going by your pattern, yours is adorable, love it ! I do have a question, concerning the backing, i too am going to use the minky , i am concerned with shifting of the batting inbetween, i would love to see a picture of the back of quilt to see how yours finished, i also wonder how can i get the edges to be as “puffy” as the bisquits ? i will be putting a layer of batting inbetween but not sure if this will create enough for the edges and too much under the “puffs” ?? Would love some feedback from you !!
Hi Sue! What’s your email address? I can email you a picture of the back and we can chat. The quilt is already very puffy even on the edge so I’m not sure you would want it more. I think you would just need to play around with it though.
What kind of material did you use for the squares? It looks like you have a variety, but we couldn’t see any just cotton/polyester. Thanks!
Have you thought of making the whole quilt first then stuffing the biscuits? Its a lot less stress on the needle/machine. I make a small slit in the bottom fabric of the puff so that I can stuff it after sewing.
Hi Missy! That’s a great idea! Maybe for my next baby’s quilt. Thanks!
Hi Amanda, thank you for sharing your puff quilt. I love the fabrics you choose it looks beautiful. I was inspired to make a quilt once I saw your post. My sister is pregnant with her first baby and I will be making a quilt for my soon to be niece. This will be my first quilting project to tackle. If you would send me a photo of the back of the quilt I would truly appreciate it. It would definitly give me a little more guidance for the back.
Hi Alexa! What a great gift! I’m sure it’ll be gorgeous! I added the photo of the back above for you to see.
Wow! This is the perfect tutorial! I’m new in the quilting field. This is going to be my first. I make it for a friend who’s expecting. I just totally fell in love with yours, and decided that it was going the be the perfect baby gift. I saw many other tutorial/ design, but yours is definitely my favourite. You used such fancy fabrics. It makes it perfect.
Thank you Amanda for sharing a photo of the back of the quilt. I can’t wait to get started. It definitly helps with the photo. I hope you had wonderful holiday season.
I am in love with this quilt! I want to try to make one for my friend’s daughter, but my only question is could you explain the satin edging to me a little more? I’m completely new to any type of quilting (and relatively new to sewing in general), so I’m pretty confused with that! Thanks!
Hi! I have all my puffs stuffed and sewn. Now I need to sew the strips of puffs together and I cannot get the fabric to feed since it is so thick. Maybe I overstuffed the puffs? Do you think a walking foot would help?
Hi Shawn! Yes, that would be fine to use the walking foot. I’d love to see a picture when you get it all done!
I made one of these years ago. What I did to keep the backing and the layer of batting from shifting, I went in between the puffs and tied a knot like you tie a regular quilt. Took a little longer to finish but was worth the time
That’s a great idea! Thanks for sharing Sally.
Love the puff quilt pattern download – now my brain doesn’t have to work so hard figuring out how placement. Great Quilt! Adorable Baby! Thank you!
Hello!!
I LOVE your quilts!!! However, I can’t seem to download the patterns for some reason!?!
I put my email address in, but I haven’t received an email …
Am I doing something wrong!?!?
Thank you :)
Hi Ashley! Sorry for the problems. Darn technology. I just emailed you the patterns. Be sure to check your spam folder if you didn’t get it.
Amanda. Love the puff quilt. I too can’t get the downloads. Will you please email them to cleta131@hotmail.com. Thanks so much
Hi Cleta! I just emailed you the patterns. Let me know if you didn’t get it.
i was wondering how big the quit is after its all done?
Hi Sarah! The final size of my puff quilt was 36″ x 41″. Just the puff area without the border is 24″ x 29″.
This quilt is beautiful and I’m in the process of making one but I’ve never done a satin edging and I could use some clarification on how you did yours!
Hi Sarah! That’s great!! Here’s a great youtube tutorial to show you how you can do it. It’s not the exact same way I did it but this is a good way to start for beginners. https://www.youtube.com/watch?v=w6u3tbcXBgY
Hi Amanda,
I laughed at your description of frantically making your quilt, not realizing you were in labour!!
I did just the same with our second child….The day before his due date, I (irrationally ) decided I HAD to put together TWO single bed ‘quilts’ for the bunk beds we’d just bought for the future. It was REALLY hot here in South Australia at the time, but neither my husband nor my best friend could persuade me otherwise!! There I was, 4 stone over my usual weight, down on my hands and knees on the lounge room floor, pinning the quilts!
My BF decided that I must be in ‘nesting’ phase and she stayed to give moral support . (I doggedly insisted on doing it all by myself….) I DID actually finish them!
I went into labour at 11pm that night and delivered our boy at 8 a.m. on his due date. (I had not had a labour with our first as she was an ‘elective’ C-section, having gone breech just 5 weeks before due date, and she would NOT be turned-twice! Dr (male) said it ‘has to be a girl because the baby is so contrary’……!!!) I had a trial of labour with the second one as ‘he’ was placed perfectly!
I had forgotten all this (36 years ago) until your story reminded me. :-)
Oh that’s so funny!! What a great story! Glad you were able to finish them though!
I love this quilt and desire to make one similar. I was wondering what pattern you used i.e. McCall’s, Simplicity . I am not referring to the ones that can be downloaded from this site as that just shows me the different ways to lay out my squares for design. I am referring to the edges of the quilt, size, etc.. Thanks.
Hi Trisha. I actually didn’t use a pattern. I just made all the squares and then joined them together as shown in this tutorial. I wasn’t too picky about sizing since it was my first quilt so just went with what I had as I made it.
Can you tell me what kind of batting you used when you were putting the quilt together? (Not the puffs)
Was it a thick poly or a thin cotton? I can’t tell from the pattern. Thanks for sharing.
Hi I’m just starting this quilt project and had a question about your tip to sew a line through the back of the mink and all of the layers to hold them together. With the puffs already filled I’m not sure I understand how you would be able to accomplish this. Please help me understand. I’m a very new beginning quilter and wouldn’t like to make this for my baby boy due in about 4 months.
Thanks so much!
Do you have to use a batting on the back of the quilt? Wouldn’t the puffs be enough batting? I had a friend that had a king size puff quilt made for him out of brown leather and black velvet puffs. It was very heavy and exceptionally beautiful. I would like to try and make a queen size one with leather and crushed velveteen or crushed corduroy. Could I use a queen size sheet for the backing and just tie the backing in between the puffs to keep it together? Would that work? Please advise. Thanks Much. Your baby quilt came out beautiful.
Carmela
cls553@gmail.com
Yep, the puffs would definitely be enough. I just chose to do the batting to make it thicker and even more cushioned.
Hi Amanda,
I am halfway through the assembly of my puff quilt (thanks for the instructions!) and thought I should tell you how I put mine together. It seems quicker and easier than your suggestion of doing one puff square at a time, then sewing the puffed squares together. (mine is 169 squares!) I figured out the layout of my quilt and then sewed the rows together, doing the tucking on the sides when joining squares. The rows did not have the top nor bottom sewn nor stuffed. Once I completed all the rows, I then tucked and sewed the top of the first row. Then I stuffed the first row and pinned on the second row, which was not stuffed. After sewing on row two, row one was completed, all stuffed and sewn. I then stuffed row two and pinned on row three. Sewed them together as before. How this makes it easier is that you are not dealing with two rows of puffy squares to sew together, let alone puffed squares to create the row. Also sewing the squares for each row together not stuffed is a lot quicker and easier. I hope I’ve explained this well enough to understand. This does not require one to slit anything after, as one person mentioned above.
Thanks for providing the information to get me going on this project for my niece who is expecting her first in April.
That’s a great tip! Thanks for sharing!!
Amanda, I have been looking for a pattern for and how to make a puff/biscuit/bubble quilt. Every site I’ve checked shows how to make the puff but does not show how to put on the back. Thank you so much for your description and pictures. I usually like for the instructor to talk not just have words and pictures. But your instructions were really clear. Thank you again.
I have been making these puff/biscuit quilts for many years and have so enjoyed reading the different ways some have used to assemble them. I did find that tying a knot between all puff squares to hold the backing to the front was the best way as it wasn’t so bulky to sew on the sewing machine if you were making a large quilt. I used decorator samples as my material which is much stronger than 100% cotton and last a lot longer. You can get these from a decorator as they usually throw away their sample books when the material is no longer available. I made most of mine as a lap type quilt and that is the only one my husband used in his recliner for a year before he passed on. My future son-in-law also stated he would not marry my daughter unless I made him his own Puff Quilt, which I did. I did not make any sash around the outside but just put on a binding just like a normal quilt would have. When you wash one in the washing machine be sure to put in a tennis ball to keep it puffy. Thanks for all your great ideas.
This is great! I am in the process of attempting to make this for my nephew – he will be here in November. However, I cannot find the pattern on your site and it did not show up in my e-mail. Making the puffs and sewing them seems to make sense but I cannot seem to figure out how to put the sides and back on with the ribbon on the edge. Could you e-mail me the pattern so I can figure out the back part?
Thank you!
-Carolyn
My children will love these! Thank you for the step by step!
Did you put batting under the edges or just under the puffs?
I have been making these. I hope my children will love these. Thanks for the sharing these specificly.
So, very pretty and I love how easy it looks to do as well. I may just have to make a couple of these this year for gifts. Thank you for the idea :)
Hi! First let me say thanks for sharing. I am new to sewing and thought this would be a great first project, I’m just a bit confused one how to do steps 8 and 9. I’m actually a lot confused, I dont understand it at all. Is there anyway you can help?