If you’re looking to block out sunlight, reduce heat, or improve your sleep—without threading a needle—you’re in the right place. Whether it’s your master bedroom, daughter’s room, or a media room that needs some extra darkness, this guide to making DIY blackout curtains without sewing will show you how to do it with ease and style.
The good news? You don’t need a sewing machine or even previous experience with fabric work. We’ll walk you through exactly how to hang, attach, and finish your own no sew blackout curtains using common materials like blackout fabric, iron-on tape, Velcro strips, and even hot glue. You’ll learn how to create a custom fit for your window, and how to attach blackout lining to your existing curtains or make completely new curtain panels from scratch.

So grab your tools and measure your window frame—we’re about to make blackout window treatments that look good, work well, and require zero stitching.
1. Why No-Sew Blackout Curtains Work So Well
If you’re new to working with curtains or fabric, the idea of cutting and measuring your own materials might feel intimidating. But going no-sew is actually one of the easiest ways to control light and heat in a room—especially if you don’t own a sewing machine or want to avoid permanent alterations.
Blackout fabric is designed to block light, trap heat, and help create a darker, cooler space for better sleep. And because you’re attaching it directly to your existing curtains or new curtain panels, you won’t lose the paint color coordination or decorative style you’ve already chosen. Simply apply blackout lining using fabric tape, iron-on tape, or Velcro, and you’re set.
These no-sew techniques are perfect for:
- Renters who can’t modify walls
- Parents updating a daughter’s room
- Anyone who needs bedroom curtains fast—without waiting for custom orders
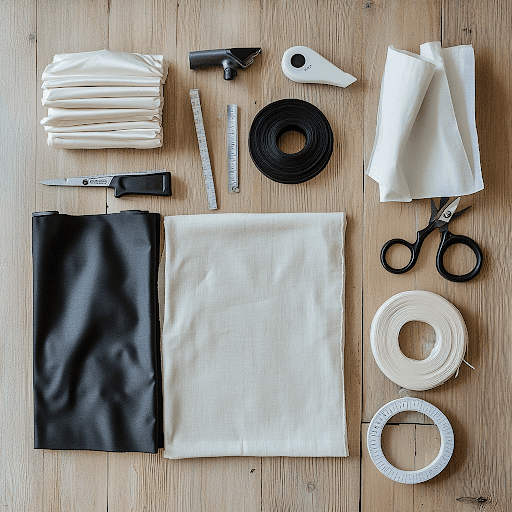
2. What You’ll Need
Before we start attaching anything, make sure you have the right tools and materials. You’ll want to gather everything in one place to make this a single-afternoon project.
Supplies:
- Blackout fabric (enough to match your window size)
- Curtains or curtain panels (linen or white fabric work well)
- Blackout lining or blackout liner
- Fabric tape, iron-on hem tape, or Velcro strips
- Curtain rod
- Measuring tape or ruler
- Scissors
- Iron
- Clips or rings for hanging (if not using pocket-style rods)
- Optional: hot glue, double-sided tape
3. Step-by-Step Guide: How to Make No Sew Blackout Curtains
Creating no sew blackout curtains is simple when you follow the right steps. You’ll use blackout fabric and iron-on tape to build full blackout curtains that don’t require a needle or thread. Let’s begin.
3.1. Measure Your Window and Fabric
Accurate measurements are the foundation of well-fitting curtains. Here’s how to do it:
- Measure the window width and height with a metal tape.
- Add 4–6 inches on all sides to ensure your blackout curtains fully cover the window and block light.
- Record your dimensions for both the blackout fabric and your decorative fabric (or existing curtains).
If you’re making bedroom curtains or master bedroom drapes, consider full floor length for maximum light control and a refined finish.
3.2. Cut and Prepare the Fabric
Cut both your blackout fabric and decorative layer to the size you measured.
- Place the blackout fabric flat on the back side of your outer curtains.
- Align the edges as evenly as possible.
You’re now ready to attach the layers using heat, not stitches.
3.3. Attach the Layers Using Heat
To bond the layers:
- Place iron-on hem tape along the edges between the decorative fabric and blackout fabric.
- Use a hot iron (no steam) to press each edge for 10–15 seconds.
- Repeat on all four sides: top, bottom, and both vertical edges.
You’ll notice the tape melts and holds the curtains together firmly. If you’re layering onto existing curtains, follow the same process using only the blackout fabric and liner.
Tip: Press from the outer layer toward the blackout fabric side to avoid heat damage.
3.4. Add Velcro (Optional)
Want to make your blackout layer removable? Use Velcro strips:
- Stick one side of the Velcro to the blackout fabric, and the other to the existing curtains or window frame.
- This lets you pull the curtain back during the day for more light, then close it at night for better sleep.
This technique works especially well in multi-use rooms where full blackout isn’t always needed.
3.5. Hang Your Curtains
Use a sturdy curtain rod and the right hanging method:
- For rod pocket or tab-top curtains, slide them directly onto the rod.
- For grommet or clip-ring curtains, clip them after the fabric is bonded.
Make sure the curtains sit slightly above the window and drop to just above the floor. This ensures they block unwanted light from the top and bottom.
You may need to adjust your rod height slightly depending on your measurements.
4. Finishing Touches and Where to Use Them

Now that your blackout curtains are built, hang them and inspect your window treatments:
- Do they fully cover the window?
- Do they hang evenly along the rod?
- Are the edges sealed well using the iron-on method?
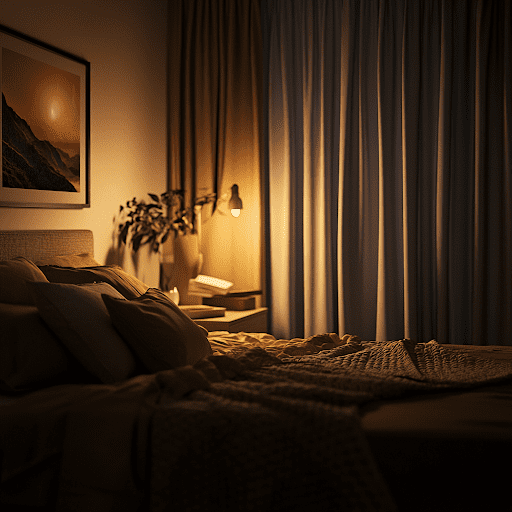
If the answer is yes, you’ve created a highly functional set of DIY blackout curtains that will help regulate light, improve sleep, and reduce heat during summer months.
You can use this same method in:
- Master bedrooms
- Guest bedrooms
- Nurseries
- Media rooms
DIY blackout solutions are especially helpful when renting, where permanent installations aren’t an option.
5. Which Fabrics Work Best for No-Sew Blackout Curtains?
Choosing the right fabric makes a big difference in how your blackout curtain project turns out.
Here are a few beginner-friendly options:
Linen Fabric (Unlined)
For a soft, natural look, go with non-lined linen fabric. Linen is breathable, easy to layer, and ideal if you’re creating a double panel with blackout lining.
If you’re ready to begin, start with the right materials. 3HLinen offers beautiful non-lined linen fabrics for DIYers—perfect for pairing with your custom blackout liners. Or, if you want to skip the project, you can check out their blackout curtains to see how gorgeous the finished result can look—all ready to hang, no sewing required.
Pre-lined Blackout Fabric
If you’re skipping layers, blackout fabric with a foam or rubberized backing is the most effective for blocking heat and light. It’s heavier, but gives you the best insulation and blackout performance.
Lightweight Cotton or Linen Blends
If you’re layering over existing curtains, use lighter fabrics. They’re easier to work with, and when paired with a blackout liner, offer great results.
Pro tip: Pre-wash your decorative fabric to minimize shrinking, especially if you plan to wash the final product.
6. How to Work with Existing Curtains
Already have curtains you love? You can easily upgrade them by adding a blackout layer to the back side—without sewing.
Method 1: Velcro Attachment
- Measure your window and cut a blackout panel to match.
- Apply Velcro strips along the edges of the liner and the existing curtains.
- Press the two layers together and hang as usual.
This allows you to remove the liner anytime for more light or easy cleaning.
Method 2: Clip-On Solution
If your curtain rod uses clips or rings:
- Layer your blackout panel directly behind your existing curtains.
- Clip both fabrics together through the top hem.
- Hang on your rod and adjust to make sure the edges align neatly.
This method is perfect for bedroom windows or rental homes where flexibility matters.
7. Final Installation and Light-Blocking Tips
Once your blackout layers are attached, it’s time to install.
- Hang your curtain set on a sturdy curtain rod—a double rod system works great if you’re using sheers in front.
- Make sure the panel width is enough to cover the full window, with a few extra inches on each side to prevent light leakage.
- Use Velcro to seal the sides against the wall for improved blackout coverage.
- Let the fabric fall to just above the floor for a finished look and to block lower light gaps.
Even in small bedrooms, this approach makes a visible difference. You’ll sleep better, enjoy more consistent room temperature, and still maintain a soft, tailored design.
8. Wrap-Up: Easy, Stylish, and Effective
No-sew blackout curtains are proof that you don’t need sewing skills to create a high-performing and attractive window solution.
With just a few basic tools—Velcro, iron-on hem tape, and quality fabric—you can upgrade any room in your home. Whether you’re improving your bedroom, converting a guest room, or simply adding blackout protection to existing curtains, this method works.
Remember:
- Always measure twice.
- Use the right heat setting.
- Choose breathable but effective material like natural linen or quality blackout fabric.