So as you may or may not have heard, we got some amazing laminate floors to replace the dingy looking carpet we had in our master bedroom and it was all going great. Install was super easy and the hardest part was trying to figure out how to transition through the doors. All in all, not too bad.
Then came the closet.
That’s the easy part, right? It’s small. It’s only going to take a few boards. 30 minutes tops. Or so we thought….
Watch this DIY Step-by-Step
Here’s how it started
First, it was starting to feel like boards didn’t fit quite right. Not a problem. We’ll just do it with two people and ease it right in there.
Not so much.
Maybe if we lift one side up it’ll snap in nice and easy? That works. Until we get to the last row.
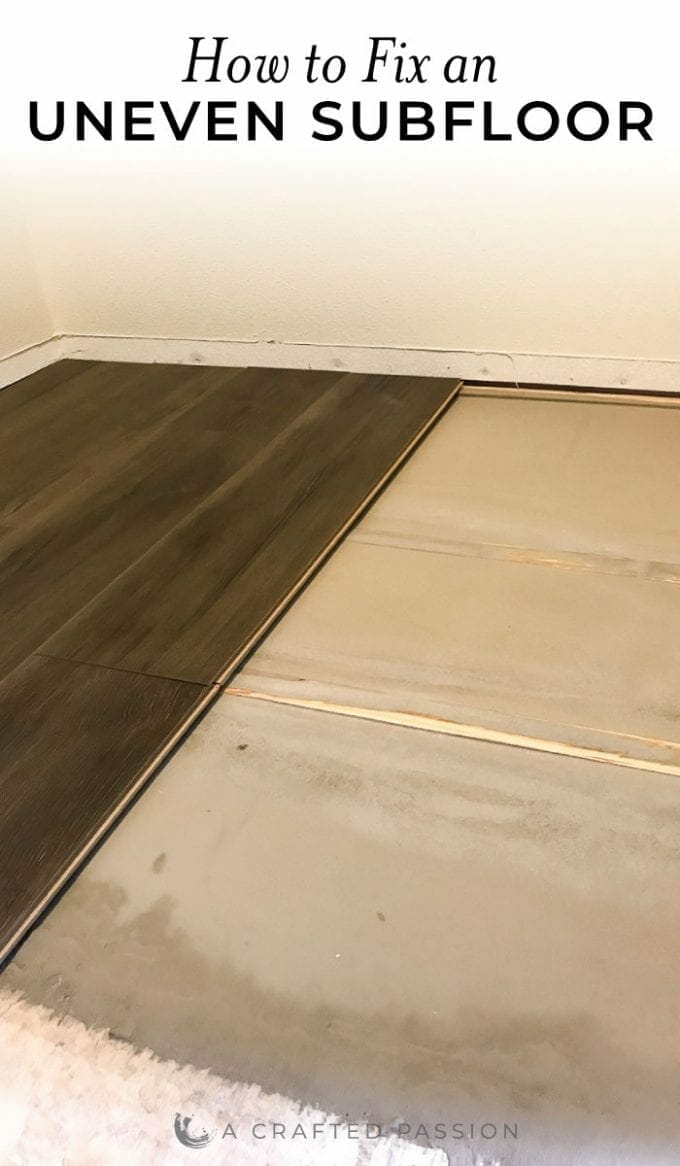
What the heck?! Something has to be off. So we grab a level and lo and behold the dang floor drops 3/4 of an inch over 34 inches!
After a few hour delay and a few Home Depot trips later, we were back in motion to finish our floors. Here’s how to fix an uneven subfloor if you find yourself in this same dilemma.
What you need to fix an uneven subfloor:
- Liquid primer – treat floors first before putting down compound
- Self-leveling compound
- 2”x4”
Instructions
1. Add Supports
After uninstalling the laminate, for the third time, it was time to get to work leveling the floor out so that the boards would install as they were designed to.
The first step here was to cut the support pieces.
Now, the size and shape of the support pieces are going to depend entirely on the size of the space you need to cover and the direction the flooring is being laid. For larger spaces or commercial projects, especially in places like Adelaide, commercial flooring experts can help with leveling and durable installations to meet high-traffic demands. Since our closet sloped down following the length of the board, we cut the 2×4 down into rectangular strips.
The rest of the steps are going to be based on the rectangular supports we used, but the same basic steps apply for the triangular supports as well.
After deciding which shape of supports you need cut the 2×4 to length.
Next, cut the board to the right width starting with the thickest portion. Once you have the first one cut, you can screw it down and measure for the thickness of the rest of your supports.
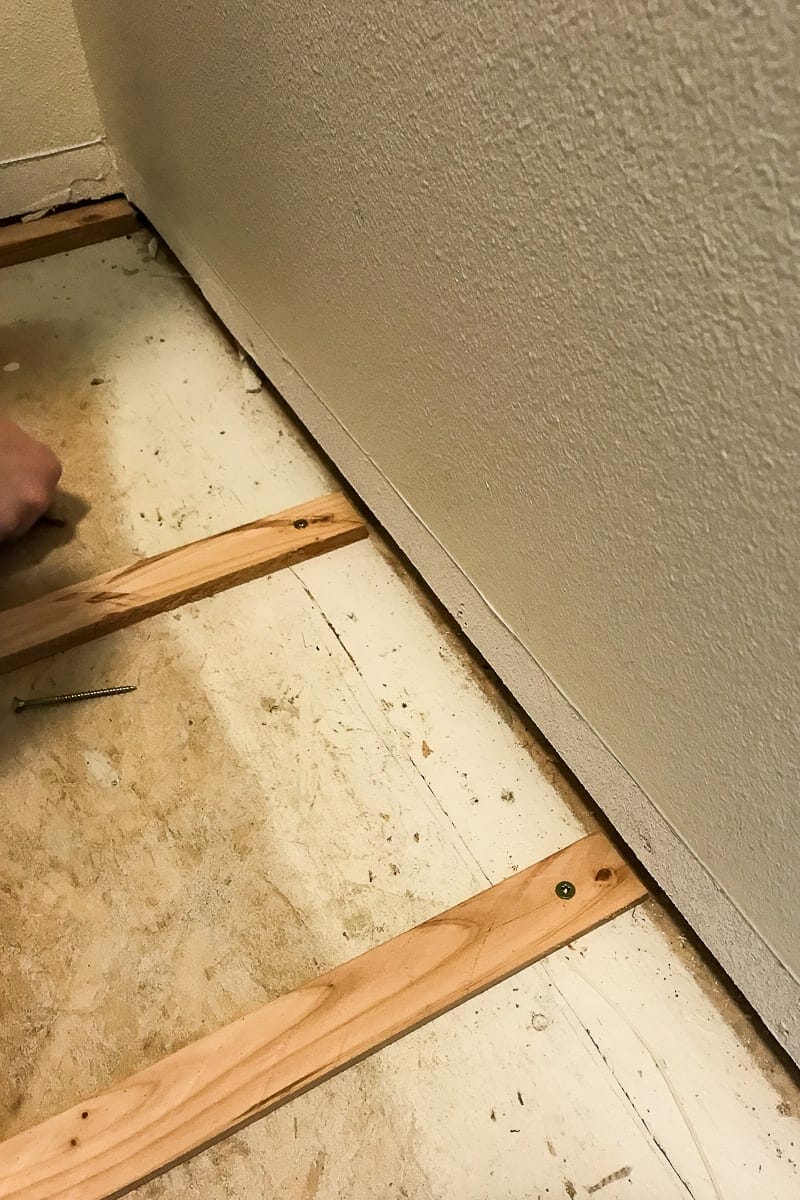
Place your level on the support and the high point of your floor so that you can determine the appropriate depth for the rest of your boards. Measure about 12” away from the board you just installed and measure the gap between the floor and your level. That is how thick you will need to cut your next board.

Repeat until there is less than 12” from your last board and the high spot on the floor.

After you screw all your boards into the subfloor in their appropriate location, it’s time to move on to the next step.
2. Spread Base Coat
The raw surface needs to be primed before the self-leveling compound is installed so that the flooring accepts the compound properly.
Dilute the primer with the appropriate amount of water for the surface you are priming. There is a different amount of water that needs to be added based on whether you are applying the primer to concrete or wood. Follow the instructions on the label to determine how much water you will need.
Once you have diluted the primer, pour a light coat of the primer on your flooring and spread it out with a brush. Make sure that you get an even coat on everything.
3. Mix Compound
Once the primer has dried, it’s time to add the self-leveling compound. Dump the mix into a five gallon bucket and follow the instructions on the package to know how much water to add.
Using your corded drill and mixing paddle, mix the compound for a couple minutes on medium-high speed until the compound is well mixed.

4. Pour & Spread
The last step is a little time sensitive so make sure that you are prepared before you mix your compound. Have a trowel or putty knife ready so that you can spread the compound out once you have poured it.
Pour the compound out starting at the deepest area working your way back out towards the high point in the floor.

The self-leveling does most of the work for you but use your trowel or putty knife to work the compound around so that it is spread between all the areas and make sure that you have full coverage.

The last thing you need to do is feather the edge up to your high spot. Use your trowel or putty knife to spread a little of the compound up towards the high point so that it has a nice, graceful slope!

Let it dry overnight before you install your flooring to allow it time to set properly and you’re done.
I was about ready to pull out my hair when we couldn’t figure out the flooring situation and I’m so glad we realized that the floor was sloped down.

Did you catch the full modern bedroom reveal?
You’ve got to check it out and let me know what you think!