
For most people planning a Perth move, it’s not the boxes that cause sleepless nights — it’s the three-seater sofa that has to come down a narrow hallway, the wardrobe that weighs a tonne, or the dining table with the glass top that cost a small fortune. Knowing how to prepare furniture for moving properly is less about becoming your own removalist and more about avoiding the last-minute scramble: the scratched doorframe, the stripped bolt, the mattress that ends up on the front lawn getting rained on.
This guide works through each room in your home. It covers what to dismantle and how, how to wrap different materials so they actually survive the journey, how to plan safe pathways through both properties, and how to make a clear-headed decision about which pieces need professional hands rather than your own. Adlam Transport fits into that picture too, and we’ll explain how.
Start early: timing, tools and a simple furniture plan
Large furniture preparation works best when it starts one to two weeks before moving day. That window gives you time to clean and dry pieces properly, deal with surprises like a bed frame that won’t fit through the stairwell or a bolt that’s seized solid, and gather materials without a last-minute dash to the hardware store.
Begin by going room to room and listing only your bulky items: sofas, beds, wardrobes, dining tables, large desks, outdoor settings and any heavy appliances. For each one, note its rough size, whether it’s fragile or has glass components, and whether it obviously comes apart. Before you touch a single bolt, photograph everything from multiple angles. This is especially useful for modular beds, entertainment units and office furniture with lots of components, because the photos become your reassembly guide.
For tools, you’ll need Phillips and flat-head screwdrivers, a set of Allen keys, a small spanner and optionally a rubber mallet. Equally important are resealable bags for hardware and a marker pen. The labelling system is simple but worth doing properly: put every screw, bolt and fitting from a given piece into a bag labelled with the item and room, for example “Master bed – slats and bolts”, then tape the bag to a sturdy part of the frame or put it in a dedicated “Hardware” box.
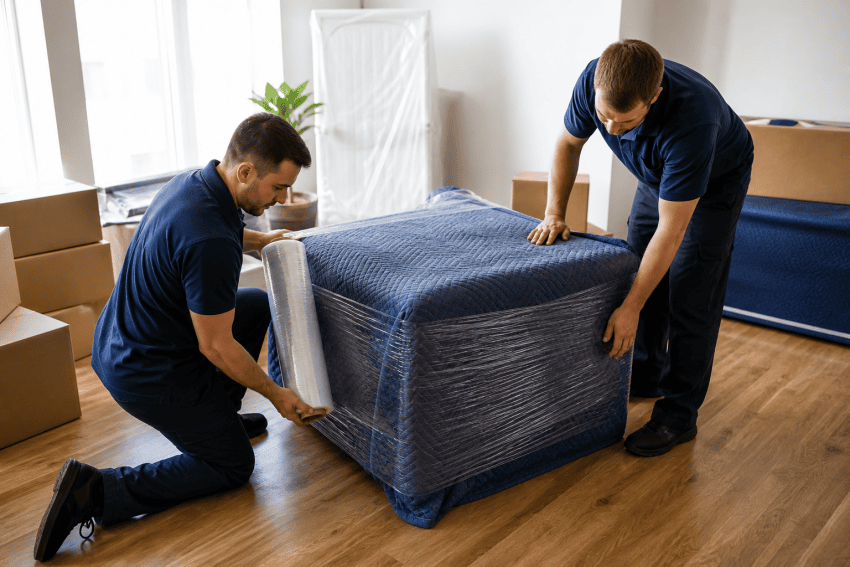
For protective materials, stock up on moving blankets or thick old quilts, stretch wrap, packing tape, bubble wrap, cardboard sheets, corner protectors, and sofa and mattress bags where possible. Having these on hand before you start dismantling means each piece can be wrapped and stored safely as you go, rather than sitting exposed while you hunt for supplies.
Room by room: dismantling big pieces without damaging them
Living room sofas are a good place to start because they’re often the most physically awkward piece in the house. Remove all cushions first, then unscrew or pop off the feet, since most sofa legs unscrew simply by hand. If the frame splits into sections with visible bolts, take it apart and keep all hardware bagged and labelled. Recliners are trickier; many have a simple release to separate the back from the seat, which is worth doing if the mechanism is obvious. If it isn’t, leave it assembled and flag it for your movers rather than risk damaging the reclining mechanism.
For entertainment units and wall units, remove shelves, glass doors and any TV brackets first. Unscrew handles that protrude, since they catch on doorframes. Tape doors shut with painter’s tape, or wrap the whole unit so nothing swings open during transit.
In the dining area, remove table legs or extension leaves according to the fixings underneath. Group the legs together, wrap them as a bundle, and pay particular attention to protecting table corners, as they are the first thing to get chipped. Chair legs are worth removing only if they obviously unscrew; forcing them risks splitting the joint.
Bedrooms typically hold the largest single piece: the wardrobe. For flat-pack styles, empty it completely, remove drawers and doors first, then take the frame apart following the cam-lock fixings or bolts. Very tall wardrobes and mirrored robes are usually safer left for professional movers, who have the right trolleys and experience for tall, top-heavy pieces. Beds are more straightforward: strip the mattress and wrap it separately in a mattress bag, then remove the headboard and footboard, detach the side rails and stack the slats together. Label every piece.
In a home office, detach tabletops from legs or pedestals where the fixing is clear. Corner desks and sit-stand desks with motors or cable management systems deserve extra care: photograph all wiring before unplugging anything, label each cable, and if the frame mechanism is complex, consider asking your movers to handle it.
Outdoors and in the garage, disassemble modular lounge sets, remove glass tops from outdoor tables and take legs off what you can. For gym equipment, remove weights, detachable arms and any shelves, but leave major frame dismantling to professionals. The same applies to heavy tool benches and large metal shelving units.
A consistent rule across every room: keep all parts from one item together, never force a fixing that won’t budge, and stop if you feel resistance that might strip a screw or crack a joint. A damaged piece of furniture is a worse outcome than one that stayed assembled.
How to prepare furniture for moving with the right wrapping and surface protection
The material something is made from dictates how you protect it, and using the wrong wrap can cause as much damage as no wrap at all.
For wooden furniture, lightly clean and fully dry each surface before packing, then wrap in moving blankets or thick cloths first. The critical rule is never to apply stretch wrap directly onto timber, particularly in Perth’s heat. Plastic traps moisture and condensation against the finish, which can warp or cloud it. Once the blanket is in place, secure it by wrapping stretch film or tape over the blanket itself, not onto the wood.
Glass table tops and mirrors should come off their bases or frames entirely and be packed separately. Lay packing paper flat across the entire surface, follow it with bubble wrap for cushioning, then cut cardboard sheets to size and secure everything with tape applied only to the card or paper, never directly onto glass, as the adhesive leaves residue that is difficult to remove. Transport glass standing on its edge rather than lying flat; laid horizontally, glass is far more likely to crack under its own weight or from road vibration.
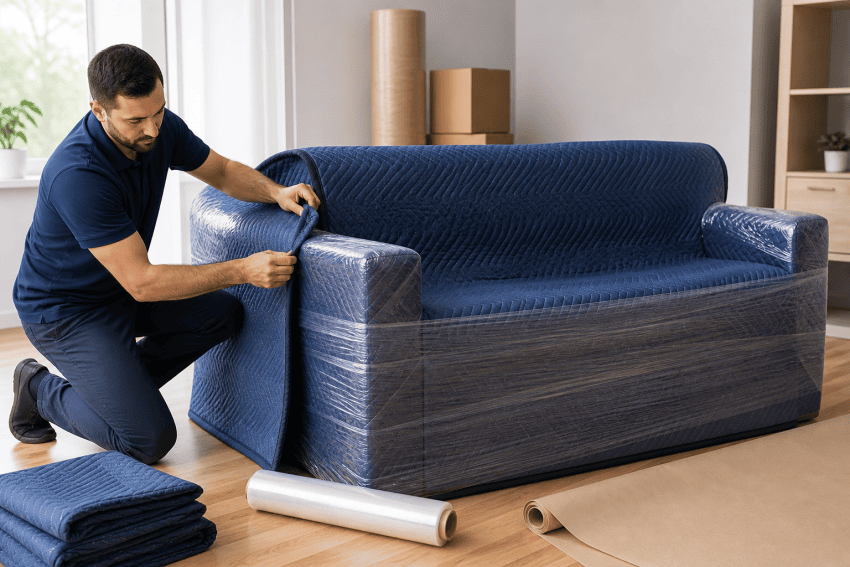
Upholstered fabric sofas, armchairs and mattresses can be wrapped directly in stretch wrap, sofa bags or mattress covers, since fabric doesn’t trap condensation the way timber does. Wrapping keeps dust, dirt and snags off during loading and transit, so apply any tape to the plastic or cover rather than directly onto the fabric.
Leather needs special thought, particularly in summer. Wrapping leather tightly in plastic on a hot day causes it to sweat and can leave permanent marks or cause the surface to stick. Instead, cover leather pieces first with a breathable cloth or moving blanket, then add a light layer of plastic over the top only for short outdoor exposure or for securing the blanket during transport, leaving small gaps for airflow wherever possible.
For antiques and pieces with delicate finishes, use extra padding: a blanket layer followed by bubble wrap on any carved details or protruding corners. Avoid any adhesive directly on finished surfaces, and label these pieces clearly as “Fragile – This way up” so everyone handling them knows to take extra care.
For drawers and doors on any piece, the best approach is to wrap the entire item with stretch film or soft rope over the blanket to hold them shut, rather than taping across painted or varnished surfaces. Alternatively, remove drawers entirely and wrap them separately, which lightens the main carcass and reduces the chance of a drop caused by shifting weight.
-

How to prepare furniture for moving with the right wrapping and surface protection
Plan the path: measuring, protecting your home and safe handling basics
One of the most avoidable moving-day problems is discovering too late that the wardrobe won’t fit through the hallway, or that the sofa can’t make the turn at the bottom of the stairs. Do your measuring before you fully wrap anything, because adjustments are far easier on a bare piece than on one already padded and stretched.
Measure the width, height and depth of every bulky item, then measure doorway widths, stairwell widths, ceiling heights for tall wardrobes, and any tight corners at both the current and new properties. If a piece won’t clear a doorway, removing the door from its hinges typically adds a useful few centimetres, and taking a door off is a five-minute job that is well worth doing rather than forcing a piece through and scratching both.
Once you know the route, protect it. Lay cardboard or protective sheeting in high-traffic areas, particularly on timber floors and at the base of stairs. Pad sharp furniture corners and vulnerable doorframes with old towels or folded cardboard secured with tape, and remove loose rugs and any clutter that could cause a trip.
For moving the pieces themselves, furniture sliders placed under heavy items on hard floors let you guide them into position with far less effort and no floor damage. Four-wheeled dollies are ideal for large cabinets and stacked items; hand trucks work better for tall, narrow pieces in tight corridors. Lifting straps, used as a two-person system, distribute the weight across shoulders and hips rather than concentrating it in the lower back.
On the lifting itself: use your legs, keep the load close to your body, communicate clearly with your partner and count in and out together. If an item feels out of control at any point, set it down rather than push through, because a controlled pause costs seconds while a dropped piece costs far more.
When professional movers are involved, all of this preparation pays dividends directly. Clear paths, measured tight spots and pre-protected floors mean the team can move quickly and confidently rather than stopping to problem-solve on the day.
What to leave to the professionals — and how Adlam Transport fits into the plan
Adlam Transport offers services around furniture dismantling and reassembly as part of a Perth move. If you are unsure which pieces they will handle and which they prefer clients to pre-prepare, understanding whether moving companies dismantle furniture for you is a practical starting point before you commit to doing anything yourself.