Did you know that fishkeeping is one of the most popular hobbies in the United States? Recent surveys indicate that out of the 56% of households with pets, almost 10.6% were involved in fishkeeping. While the fascination with these aquatic creatures continues to grow, so does the cost of raising them.
Perhaps that is why most people resort to smart hacks and DIY techniques. The list of smart hacks is endless, from building your own aquariums to even DIY canister filters.
What are Canister Filters and Why Do I Need Them?
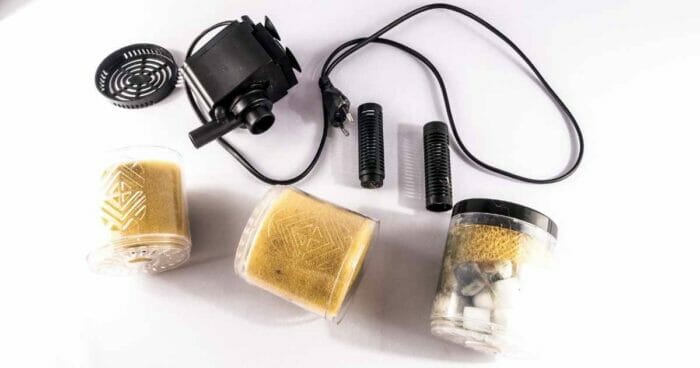
One of the most important aspects of fishkeeping is ensuring that you provide them with a clean, hygienic environment. This means maintaining the quality of the water in the fish tank or aquarium; this is precisely where the canister filter comes in handy.
They are designed to move the water from the fish tank into a valve or an intake tube and then pump back the filtered water back into the fish tank through a spillway. While buying canister filters may sound like an easier choice, they can also be a drain on your pocket.
Amazing DIY Canister Filter Ideas
1. Making a DIY Canister Filter from a Container
A homemade container canister filter typically sucks in the water and rids the water from any sort of debris, germs or even dust. It then pushes the water through the canister and drains it out.
Things you will need:
- A large plastic jar or a container (preferably a cookie or a pretzel container)
- A cordless drill
- Connector
- Elbows
- PVC pipe
- Rubber tubing
- An aquarium sealant
- bags of charcoal and Ammo
- bio balls
- scrubby pads
Method
- To begin with your DIY Canister filter, find a large plastic jar or a container and remove any sorts of labels or wrappers from it. Now perform a leak test on it to make sure that it can withstand pressure.
- Next, using a cordless drill, drill two holes on the lid of the container (make sure these holes are drilled between the center and the outer edge of the lid).
- Now take rubber tubing and cut one end of it at an angle. Insert this tubing in the first hole on the hole (use a lubricant like cooking spray if the hole and the tubing is a snug fit) Pull the tube 4 to 6 inches down (beyond the lid to help in pumping the water).
- Next thread the connector onto the threaded elbow and then thread it down into the hole made on the lid. Be sure to have a snug fit to prevent any leakage.
- Place the open end of the elbow towards the outer edge of the lid. If you want, apply a sealant between the connector and the lid.
- Now thread the second elbow over the connector (which is protruding from the bottom of the lid) In case you aren’t sure about the tightness of the hole, you can also apply a sealant around the connector at the lid. Tighten the elbow down with the open end pointing towards the center of the lid.
- Now take the piece of a PVC pipe and attach the other elbow on the open end of the pipe. Keep the open ends facing downwards to help you drain the water back into the fish tank.
- Now layer the bottom of the container with bags of charcoal and Ammo-lock and fill 3/4th of the container with bio-balls followed by placing scrubby pads on top of it. By now your container should be filled till about 2 or 3 inches below the top of the jar.
- Carefully place the lid over the container while easing down the rubber tube into the filter media. Tightly screw the lid back on top and place the filter next to your aquarium at a height.
- Attach the pump to the canister filter and watch it work its magic.
2. The XL Aquarium Canister Filter with a Five-Gallon Container
Getting your hands on the famous A214 FX4 canister filter is every fish keeper’s dream. However, doing so will probably cost you approximately $460. But, if you opt for this DIY canister, it will allow you to enjoy this model’s grandeur and spacious design and provide an economical means of filtering plenty of water.
Things You’ll Need:
- A bucket
- A Gamma seal lid
- Uni-seals
- Power head with suitable flow
- Mechanical and biological filter media
- Settling the bucket woes
To get started, you will have to get a 5-gallon bucket. Once you have that, you must also acquire a gamma seal lid. A superficial ring can break around the bucket and form an esoteric seal due to the washer that seals the gap in it. The top cluster within the ring makes it waterproof due to the presence of a washer in it as well.
It’s now a truly waterproof bucket with a removable lid with a clinched ring on top so that it does not remove. Remember to close the lid tightly so that it does not leak under pressure or does not put stress on the seals.
2. Installing Uni seals and making holes with the help of drills
The next step is to install Uni seals. All you need to do is to drill two holes, one in the middle of the lid and another at the bottom of the bucket ( just like in a water cooler). You need to use a pair of one-inch Uni seals for this project which must be inserted in the holes you made with the help of a drill.
These Uni seals are our way of fixation into the canister. Now you have two holes, one at the top and the other at the bottom; we can say these as entry and exit doors. For further reference, take a look at the size chart below:
Uni seal for ½ (UNISEAL -0050)—1.25 Hole saw
Uni seal for ¾ (UNISEAL-0075)—1.25 hole saw
Uni seal for 1 pipe (UNISEAL-0100)—1.75 holes saw
Uni seal for 1.25 pipe (UNISEAL-0125)—2.00 hole saw
Uni seal for 1.5 pipes (UNISEAL-0150)—2.50 hole saw
Uni seal for 2 type (UNISEAL-0200)—3.00 Hole saw
Uni seal for 3 type(UNISEAL-0300)—4.00 Hole saw
3. Installing PVC pieces and biological media
The next step is to install our biological and technical media for filtration. Simply cut the polyvinyl pipe into pieces slightly larger than the Uni seal and make it like a stand. Place mechanical media on this stand. Now you have a lightning diffuser propped up by some PVC pipe to ensure no media was depreciated or plugging up the bottom.
4. Lower the pressure over your canister seals by using a pump
Using a pump to squeeze water from inside to outside can decrease pressure on the seals of our DIY canister filter. If we pump water into the canister, it can create a lot of stress on the seals. Attach a pump to the bottom of the canister.
5. Insert Union valve and ball valve
Both input and output use the same primary component; Union wall and ball valve.
- The union valve helps cut the water flow after the pump is shut off.
- The ball valve disconnects everything from the canister so we can clean it if needed.
Putting it all Together
- Slide your PVC into the uni seals so that they form their own seal and would ensure that the water flow remains intact. Now attach bumpers to make inputs and outputs. If you close the ball valve and remove the pump by twisting off the union, due to the closure of the ball valve, water will remain in the bucket for the top of the bucket.
- Alternatively, you can purchase a DCT pump (which usually doesn’t cost more than $20). These are easy to use as they come with a controller to manipulate the flow. Now attach the hose with the pump, then attach it to the Uni seals.
- Next, join the pipe system and pump to the hose. PVC pipes are attached to the tank by Connecting a few 90-degree elbows. If you want, you can replace the PVC pipe’s length with barbed adapters and hose both at the input and output.
- You can use PVC pipes, a couple of elbows and an end cup, all three-quarter inches. Two elbows will go over the rim of the tank and then drill holes in the pipe to allow water flow. Remember to drill the holes in the bottom area with adequate size. The end cup can slide on and off to allow pipe cleaning if needed.
- For media, try using a couple of bags of media rock. These are easily available in the BBQ section of the hardware store and serve as a great biological media. It is then covered with some cheap polyester filling which will act as a mechanical media. Next, lubricate the seal with Vaseline to ensure that the lid seals correctly and tightly.
How Does the DIY Canister Filter with a Gallon Container Work?
This DIY canister filter will work the same way as any other canister filter does. All you have to do is suck the output for a second until water starts to flow into the canister. When you turn on the pump, water is sucked in from the input.
Then, it enters the bucket and is mechanically filtered. First, debris is removed from the water by the filter floss we added on the top, followed by flowing over the lab, where it will be biologically filtered and then returned to the tank.
Making a DIY Canister Filter from an Old Plastic Box
Tools required for creating DIY canister filters from the plastic can be readily available at home. To make a DIY canister filter from an old plastic box, you will need the following:
- A plastic box (HP<849)( capacity =5000ml)
- An aquarium pump( 1400 L/H- 26W)
- Nipple+ Hose 5/8
- Epoxy glue
- A tool to remove air from the box
- Silicone glue
- Foam
- Bio rings/bio balls
- Simple pipes
- Lily pipes
Method
- Take a 5000ml plastic container or jar with an easy-to-close lid.
- Take a quality pump. (Make sure it’s an AA1600 1400L/H-26W.)
- Now connect the nipple to the hose. After connecting, attach this combined Hose and Nipple to the pump. Place the pump inside the plastic box and secure it with a lid on top.
- Create two holes in the lid with the help of a drill. These two holes must be on opposite sides of the lid. Use epoxy glue to connect the hose and nozzle in these holes. At the inner side of the lid, attach a piece of PVC pipe; on the outer surface, attach the pump. Also, create two small holes. One for the pump wire to come outside and the other for the little yellow-colored tool used to remove air from the box.
- Now use silicone glue at every point you make a hole. It will work as a strong binder and can seal space, if any. It will make the holes completely sealed as well as the hose and nipple. Next, make holes in the partition of the box and bind it with the box with the help of epoxy glue.
- After you have bonded this plastic partition in the box, you must put some foam and bio rings into the box. If you don’t have bio rings, use bio balls as an alternative. These rings actually act as a filter in the DIY canister filtration process.
- Close the lid. Connect pipes to the hose and insert the pipes into the water of the aquarium after adding at least two to three glasses of water in the foam and bio ring area. After that, close the lid tightly.
- Supply electricity to the DIY canister filter, and you will see the filter working. Out of the two pipes, one will act as an inlet, and the other will act as an outlet. Thus, from one side, water will leave the aquarium, enter into the DIY canister filter, and enter the aquarium through another pipe after filtration.
Conclusion
Making a DIY canister filter at home can be quite tricky at first, but once you get the hang of it you’ll not only enjoy the process of creating something yourself but you will save money as well.