Create a family communication board to get organized on a small wall instead of a full command center. This simple DIY idea has all the essentials for a great space to get your family organized.
As we work to make more sense of our unorganized life, I’ve been thinking we need a spot to write quick notes, leave reminders, and just have a catch all spot. I set to work to create something that would fit our space, but would not fill up our only empty wall in our kitchen/dining room area. Hence, I created a family communication board that is perfect for small spaces.
This is the perfect spot to just keep the essentials. Current running grocery list, reminders for my husband to take his lunch to work (even though we all know that’ll only happen maybe 1% of the time), and tack up anything else important.
Let me show you how I made ours so you can make your own.

*This post contains some affiliate links for your convenience (which means if you make a purchase after clicking a link I may earn a small commission, but it won’t cost you a penny more)! Click here to read my full disclosure policy.
Craft Time: 1 hour
Waiting Time: 1 hour
Skill Level: Intermediate
Cost: $20
Materials to make your family communication board:
- Birch plywood
- Dowel
- 2 – 1″x2″ wood blocks
- 1-ply bond paper roll
- Tin plaque
- Cork
- Painter’s tape
- Paint
- Leather lace
- 2 – 1″x5″ Leather strips
- 4 thumbtacks
Tools
- Drill
- Sandpaper
- Dry cloth
- Metal snips
- Scissors
- Wood glue
- Multi-purpose adhesive spray
- Hot glue
I will admit that after writing this all out it looks like a lot. I promise it isn’t! I only had to specifically buy two items. Everything else I already had on hand for other projects I was working on.

1. Prep Board
First, you need to cut your base board to size. My family communication board is 12×20. Drill two holes towards the top where you will string the leather lace to hold it in place. I just used leftover 1/4″ birch plywood from the giant pegboard.
2. Paper Roll Holder
For the paper roll holder, it’s just a roll of paper that stores use in cash registers. You can either find it in your local office store or grab it right here on Amazon.
Cut your 1×2 in about 3.5″ blocks. Drill a hole directly in the middle of each block that is just slightly larger than your dowel.
Sand the edges to smooth it out and then use a dry cloth to clean it up.
You can paint, stain, or leave this blocks raw.
Next, cut your dowel to length and make sure it all fits together.

Cut two strips of leather that are about 1/2″ by 5″. You will use these to keep the paper from curling up.


3. Cork
Print out a small hexagon shape, cut it out, and then tape it to cork square. This is the best way to cut out your cork because you want to make sure your hexagon shapes are as close to perfect as possible or else it’s easy to get the angles off.

Once you have your hexagons, paint them white, let them dry, tape off, and then paint the opposite black.
6. Tin Magnet Holder
This tin holder is actually a magnet board from Michael’s that I cut down and painted. They are not seasonal so you should be able to find them all year long.
You’ll need to use metal snips to cut the top of your tin to make an opening. Once you cut to each edge you can fold down the top parts so that it’s rounded and not raw metal.

Give your tin a few coats of matte black spray paint and then I chose to hot glue a small piece of leather lace to the top just to make sure no one cuts themselves on any leftover pointy metal remnants.

7. Make The Important Info Permanent
A family communication board is a great way to keep everyone in the family on the same page. However, it is also a good idea to add a specific place on or next to the board with all the important emergency numbers. This will ensure that everyone knows where to find the numbers in an emergency. The most critical numbers to include are the fire department, the police department, and car accident lawyers, or even better an all-round personal injury lawyer for any eventuality. Having these numbers readily available can help ensure that your family is prepared for anything.
8. Assemble
Alright, so now you have all your pieces it’s time to assemble it!
Lay it all out before you start gluing just to make sure it fits the way you want.
Starting with your paper roll, set your dowel in the wood pieces with the roll on to make sure it all fits correctly. Put wood glue on the bottom of each block and then clamp them down to the board.
Let it dry at least an hour before continuing on.

Then, take your leather strips and use pushpins to attach one leather strip near the top of the roll and one near the bottom to hold the paper in place.
Next, take your multi-purpose adhesive spray glue and spray the backs of your two hexagon corks until they are completely covered with spray glue. Place them on the board right away and then stack some heavy items on top to make sure it holds completely.

Time for the tin holder. I found this was easiest to attach with hot glue. You have a very thin area that needs to be covered quickly. Hot glue the edge that goes against the board and then set it down quickly pushing it against the wood. Hold it for 20-30 seconds to make sure it adheres well.

Lastly, you need a way to hang it. String your leather lace through the holes you drilled at the top of your board at the beginning, tie a knot at the top, and you’re done!!

We don’t have school schedules to communicate or sport activities that requires elaborate home command centers, so this is just perfect for us! I love how it turned out and gives a spot to keep all the essential things we need. Plus, no more searching around the house for a pen when I need to add something to the grocery list!

Do you have a family communication board or command center?
How does it work for your family?

Make this easy hexagon art to display on your wall using coffee stirrers. This DIY honeycomb design inspiration is too cute and simple!

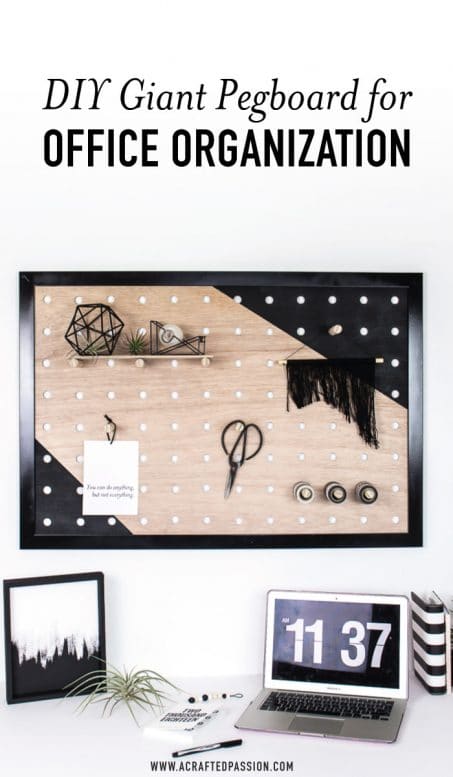
See how to make a DIY giant pegboard perfect to get your office organized. This modern oversized pegboard looks great and is functional.