*This post is sponsored by Stikwood. As always, all opinions are 100% my own. For more information, see my disclosure here.
Watch the Transformation Video
Here’s how it all started:
You walk in our home and see our moody entryway to the right and a boring, disorganized long living room to the left that is awkward as heck. We’ve been in our home for over 6 years and it’s time to make some changes!
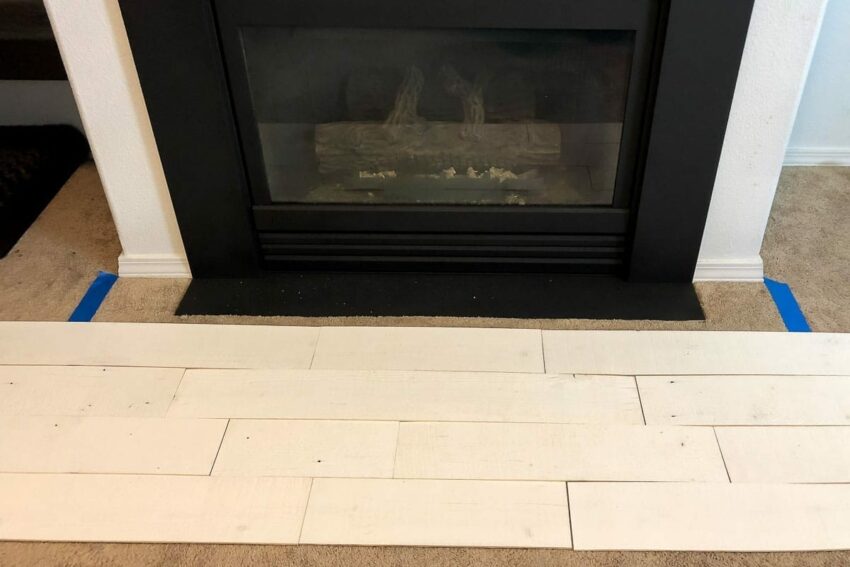
We decided to tackle the fireplace area first since that is front and center and would be high-impact. Here is what our fireplace area looked like before we did a one-day makeover last week.

Boring and drab. I mean it’s okay, but definitely not our modern industrial style. We added floating shelves and mantle soon after we moved in and then mounted the TV about 5 years ago. Besides that, we’ve never really done much more than that.
As our family has grown though, we’ve had to rearrange furniture to accommodate our tiny humans and our living room just looked so funky.
Time for a change.
I reached out to my friends at Stikwood and they were gracious enough to send me some of their peel and stick wood to try out, and you guys!! Spoiler alert, it’s amazing!!
I started out by ordering some samples of light and dark Stikwood because I wasn’t sure which would look better in our space. The amazing thing about Stikwood is that it is legit, real wood, but super lightweight.

In the end, I fell in love with the white pine Hamptons planks and ordered 75 sq feet to cover our entire fireplace surround walls. Get some here on Amazon!
Here are some of my best tips after testing and playing with these gorgeous planks for a day.
Installing Stikwood Tips
1. Paint
Make sure your wall is a similar color as the wood you are adhering. There are holes in the wood and you don’t want a dark wall peeking through gaps or holes in the panels of your light colored wood.
2. How to Start
Start at your center and work outwards. It’s easiest to build off the middle so use a level to draw a straight line about centered where most people will be looking.
Since each panel is 5″ and I wanted whole boards running along the top of the fireplace, I measured 20″ from the top of the fireplace marble and then used a level to draw a straight line.
I also wanted to get an idea of the layout and found it was easiest to layout a few rows at a time so that seams were spread out and there was enough length on each end to wrap around to the side of the walls.
3. Measure Twice, Cut Once
Measure each piece separately. There is no guarantee your wall or ceiling are perfectly square so even though you might need a 6″ length to go down an edge, that doesn’t mean the next board down is going to be exactly 6″ too.
The pieces on the edge of the fireplace near the bottom of the wall had to be cut at an angle because the wall angles by about an 1/8” more as it goes down. I didn’t catch that until I did a few boards and had to backtrack to adjust the Stikwood panels.
4. How to Cut Stikwood
I tested out many ways of cutting Stikwood. If you have a chop saw, I suggest using that for most of your cuts.
For ripping down boards that need to be narrower—like where we hit the floor and ceiling—rip those with a table saw if you have access to it. Just remember to measure for each piece individually.
If you have small cuts, you can easily just use a utility knife and self-healing mat.
5. Corners
Stikwood has corner metal trim to use for corners, however, when I was researching Stikwood I found I liked the look better on the corners that didn’t use the metal trim. Instead, I decided to cut each board and then wrap that piece around the corner and butt them up tight so the grain matches up.

Since the adhesive adds about 1/8″, we used a utility knife to cut and peel off about 1/4″ of adhesive from the front plank and then butt the side pieces up tight right against the Stikwood panels.


Our whole house is filled with rounded corners, so I love how this area now stands out with it’s crisp 90 degree corners.


When cutting around outlets, light switches, or shelves, it’s easiest to measure each panel and then cut it using a scroll saw, hand saw, or jigsaw.

6. Overage
Just like when we ordered our laminate flooring, make sure and order about 5% more than you think you need to account for overage and mistakes.

I always thought that shiplap was just for the farmhouse styled homes, however, I am firmly convinced now that it is perfect for any home. I love how Stikwood can so quickly transform a space and am obsessed with our modern upgrade.

Common Questions about Stikwood Adhesive Paneling
Where to Buy Stikwood?
Online is the best option – try these ones from Amazon that I love! You can order samples, which is what I did, and then test out the different panels in your own space and lighting. Sign up for their email list at the bottom of this page and watch for coupons or sales.
What else can I do with Stikwood?
You can get so creative with this peel and stick wood! Here are some of my favorite uses of Stikwood I’ve seen.
- This rustic wood ceiling is amazing!
- This simple entry transformation looks great!
- I’m obsessed with Kristi’s entire room, but specifically check out that massive barn door and herringbone wall! It’s so good!!
- This simple IKEA hack is so fun!
- And of course this kitchen bar update is so cute.


