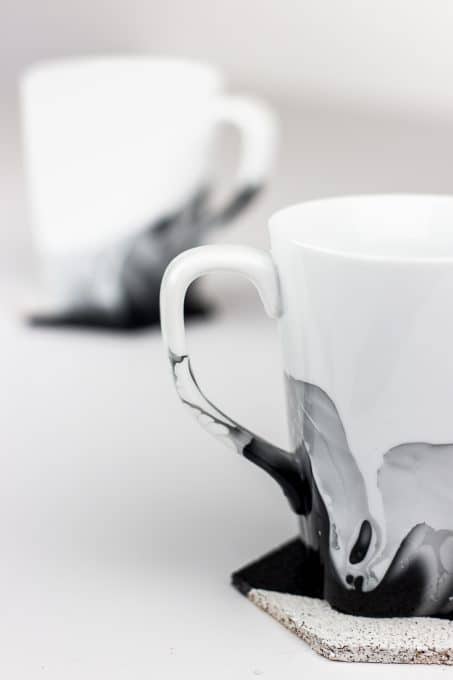
Create marble mugs using nail polish with these simple tips. You can easily make your white coffee cups look like they have been painted with watercolors.
Ever since I worked front desk at a hotel and felt like people were staring at my hands all day, I’ve been obsessed with water marbling when I use to DIY my nails at least once a week. Then last year I decorated Easter eggs using the same concept using nail polish and water.
Water marbling is so fun and I knew I needed to transform some white mugs we had and turn them into marble mugs.

*This post contains some affiliate links for your convenience (which means if you make a purchase after clicking a link I may earn a small commission, but it won’t cost you a penny more)! Click here to read my full disclosure policy.
Craft Time: 10 minutes
Waiting Time: 24 hours
Skill Level: Easy
Cost: $10
Materials to make your marble mugs:
- White coffee mugs — I grabbed these two rounded square mugs right here.
- Disposable container
- Hot water
- Nail polish
1. Water
Fill a disposable container with about 2” of hot water. Make sure the container is wide enough to fit your mug. The hotter the water, the slower your nail polish hardens.
This is a project where you need to work very quickly.

2. Add Nail Polish
I just grabbed some cheap nail polish from my local drug store and they turned out great.
Holding your nail polish right above the water, pour your nail polish into the water moving it around a bit. If you hold it too high you risk the nail polish gaining too much speed as it falls and the nail polish may sink to the bottom of the water.
It will naturally spread out, however, if you want to mix it around with a toothpick you can. Just make sure you do it quickly.

You might notice that the pictures below are different. I was too busy trying to get pictures of the process that the nail polish dried too much and the mugs didn’t turn out as awesome as I had hoped, so I did it again. So, learn from my mistakes. Work quickly and be efficient.


3. Dip
Dip your mug quickly into the nail polish on the water and pull out the mug.
Again, this whole process from when you pour the nail polish to when you dip the mug should take about 10 seconds or less. If the nail polish dries too much you may get a lumpy look and less marbley.

4. Set Aside
Set your mug aside upside down to dry, and you’re done!
I love how these mugs look and can’t wait to try some other color combos!


I want to marble all our white dishes now, but my husband said no. Bummer! If you make them though, will you please tag me? I’d love to see what you do! #acpnaptime
So, here’s my question for you…
Would you stick with neutral colors or try some colorful marble mugs?

See how to make a DIY giant pegboard perfect to get your office organized. This modern oversized pegboard looks great and is functional.
Make this easy hexagon art to display on your wall using coffee stirrers. This DIY honeycomb design inspiration is too cute and simple!
Want a modern home on a budget?
Subscribe and get this FREE GUIDE to learn the tips, tricks, and my best resources to create a family-friendly modern home on a budget!


Oh my gosh! I love those marble mugs. I have to try this and it seems like an easy project but has a high end look! Saw your post at the inspire me monday party:)
Heyy Amanda :) love this idea… are the mugs dishwasher save afterwards?
Hi there! LOVE how these mugs look. Assuming that prior to marbling the mugs are dishwasher/microwave safe, would they still be dishwasher/microwave safe after marbling? If not, what are care instructions for these?
Thank you!
How much nail polish did you use for each mug?