Build a rolling workbench with easy to follow DIY plans. This is perfect to add more storage in your garage to hold your tools and get you organized!
For years I was creating and building in whatever corner of our apartment or balcony space my hubby would let me claim. Then we bought a house and our garage became a dumping ground for everything we didn’t know what to do with.
Throughout the past three years as projects have gotten bigger and power tools are used on an almost daily basis it became much more necessary to make a place to confine the mess and get organized.
Then walked in the Shanty2Chic sisters….or more in they talked. They started sharing their own organization on Periscope and it motivated me to get my butt in gear to create a space that screamed for more creativity and projects.
So, today I am excited to say phase one of our garage makeover is complete! And I am even more excited to share with you how to build a rolling workbench…your very own, grown-up, awesome workbench. It has seriously changed my DIY life!

I started by, of course, searching through Pinterest to get some inspiration. Found a free workbench plan on Craftcamp website, which I loved. I also love the workbench Shanty2Chic built and also Ana White’s workbench. I used both of these as a guide to create one that would fit well in our space and also based on what material I already had. This workbench cost us less than $35 to build! Since then the price of the casters went up, but this project is still much cheaper than buying a workbench. Here’s how you can make your own.
Materials to Build a Rolling Workbench
- 4 – 5″ swivel casters
- 2 – 4″x4″
- 7 – 2″x4″
- 2 sheets of plywood
- Screws
TOOL LIST
- Drill
- Chop saw – to cut 2×4’s and 4×4’s
- Table Saw – to cut down plywood
- Jigsaw – to cutout 3.5×3.5 squares from bottom shelf plywood
- Kreg Jig
CUT LIST
- 4-4″x4″ cut at 30″
- 2-2″x4″ cut 84″ long
- 4-2″x4″ cut 27″ long
- 2-2″x4″ cut 74″ long
- 2-2″x4″ cut 20″ long
- 2-2″x4″ cut 24″ long
- 1-30″x84″ plywood
- 1-27″x81″ plywood with 3.5×3.5 cutout squares in each corner
INSTRUCTIONS
1 | Cut
Start by getting all your boards. Follow the cut list above to get them all cut to size. Once they are cut, layout the top and bottom shelves so you can visually tell where each piece is going.

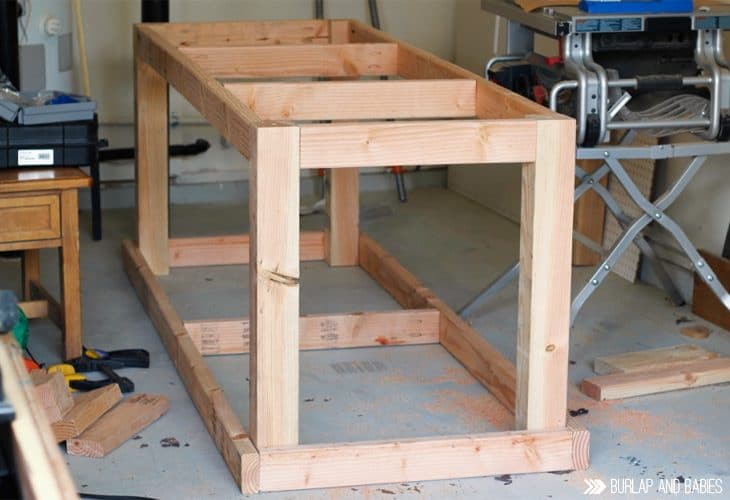
2 | Drill
Using your kreg jig, drill 2 holes in each end of your 4 30″ cross boards. Attach these to the 84″ boards to create a rectangle with 2 support pieces. This is your top platform.

Next, using your kreg jig, drill 2 holes in each end of your 74″ boards and your 2 20″ boards. Attach these to your 4 30″ 4×4 legs to create the base. This part is a little bit tricky to do free hand so it is best to use a couple of large bar clamps if you have them.

#diyproject #garageorganization #workbench #tutorial
3 | Attach
Once your base is assembled, flip it over and carefully place it inside the frame you created for the top. From here, you can easily attach the top to the base with a couple screws in each corner.
4 | Casters
While the workbench is still upside down, drill a hole in the center of each 4×4 for your casters. If you want to glue them in you can but the weight of the workbench will be enough to keep it on the casters. Be sure you get casters that are made to hold the weight. To be safe, I used casters that each can support 150 lbs each.
These casters from Amazon would work great!

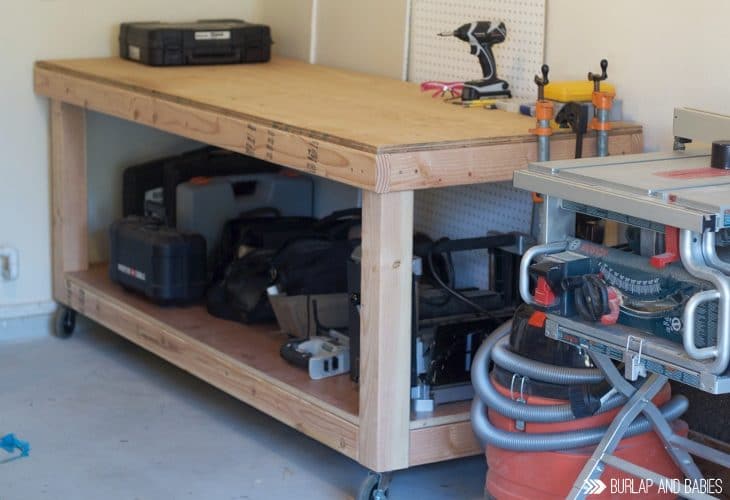
5 | Top
Flip the workbench over and insert your casters if you have not done so already. After you have done that, place the 30″ x 84″ piece of plywood on the frame and screw it in.

6 | Shelf
Now, the only thing left to do is insert the 27″x81″ plywood with 3.5″x3.5″ cutouts on the bottom frame. You can attach this board with screws if you want but the legs will hold them in place so you don’t need to attach it to the frame if you don’t want to.
If you’re having a tough time getting it into place, use a rubber mallet to pound it into place.
Roll it to its new home and you’re done!
I love how huge ours is and helps give a home to so many of the miscellaneous tools that have just been floating around our garage. I think my favorite feature, however, is the fact it can roll to wherever I need it. So when I’m working on a big project I can just roll it to the driveway and then back into the garage when I’m done for the evening…or who are we kidding, naptime. Because, honestly, when else do we work on projects, ladies! #amiright


I am excited to start phase two of our garage makeover this week, which includes pegboard organization and some cutesy wall art. Yes, I just said wall art for the garage. When I told Justin my plan he thought I was crazy but I promised him it’ll be manly enough for the garage that even he will like it. I can’t wait!!
Are you going to try to build a rolling workbench?
If you love this workbench, I’d love for you to pin it or share it with all your friends using the buttons below!
Like this post? You’ll also love these…
Try a simple and cute bar stool makeover using a little paint, foam and fabric!
Build a simple side table for just $15 using these Target knockoff plans. This modern look is perfect to go beside your bed.

Want a modern home on a budget?
Subscribe and get this FREE GUIDE to learn the tips, tricks, and my best resources to create a family-friendly modern home on a budget!

I just built a rolling table for myself that looks just like this and love it! Thanks for sharing!
Awesome!! It makes such a difference in my productivity. :)
Only $35? That’s insane! A prebuilt workbench like this would have surely cost at least a few hundred, so that’s some amazing savings. Plus you get the sweet satisfaction of having built your own furniture, which is a reward in itself. Great job :)
So happy I stumbled upon this. I am building a workbench this weekend and love this design as it allows a lot of room on the bottom shelf, which I want. Nice!
Amanda this is such a great project! I’m always looking for ideas on improving my work/project space and I love this workbench! The fact that it has wheels and can be moved around makes it even better. Thanks for sharing!!
Shonee
http//:www.hawthorneandmain.com
This is just what I need. I am going to make it today. Thanks.
Great looking, portable, robust bench for under $35, wow!
Seriously 35 bucks? what great way to start building this workbench for a cheaper cost, looking forward for your next projects!! Thanks!
Nice!
You know it makes sense in more ways than one when all your tools are in the right place.
Can you clarify step one? Are those the 30 inch legs or is there another cut that needs to be done?
Hi Steve! Yes, the legs are 4×4 that should be cut down to 30″.
Really love to read this post and its seems like a great blog i have ever seen
Nice and easy to follow. Thank you.
I have the lumber in my garage ready to go! I used treated 4X4s so the price was a bit higher. My Lowes did not have the single male insert casters so I went with ones with 4 holes on a plate and will use lag bolts to hold them on. I’ll let you know how it goes.
I did the same thing but redrilled all the holes to get the screws closer to the center of the 4×4
What are the 4 – 30″ cross boards? Those are not in the cut list at all?
It should have read 27″ as per the cut list
Wow thanks for this, I found a new project for this weekend. I can’t believe how cheap it is to make! Is it possible to build this without a jig, or will it not be sturdy enough? I might have to go find a cheap one if not.
Awesome workbench. Is that cost for real? Now I’ve got no excuse to go and buy one. DIY for the win!
Thanks for share it ! I also start a new project . can you please tell me the kreg jig alternatives ?
made this yesterday. thanks for the plans. only thing is your picture only showed a total of 7 cross boards on top and bottom when the cut list called for 8 so i just put where I felt it would go. And I cut the legs a little longer and left off the casters. going in a portable garage with a sand floor so casters would be impractical. I put my legs on 4″ x 8″ x 16″ concrete blocks to keep it out of the sand. All in all a nice size table. Also I’m too cheap to purchase a kreg jig so I just took a 1/4″ drill bit, made a couple of small pilot holes 1 1/2″ from edge then stuck my bit in the hole and manuevered my drill and bit downward and voila cheap pocket holes.