I received compensation to complete this project for using FrogTape painter’s tape products. All opinions, projects, and ideas are based on my own experience.
When we were planning out our kitchen remodel I knew that we wanted to make over the cabinets. It was something that just had to be done. The dark cabinets were making the kitchen feel a lot smaller than it was. I knew it was going to be a big task, but it needed to be done.
I’m eager today to show you all the tips and tricks we learned from painting our cabinets and the different tools we used to do it.

First off, I want to explain to you exactly the steps we took to refinish our kitchen cabinets. Everyone does it a little differently and I want to explain what worked for us.
Steps for Refinishing Wood Kitchen Cabinets
1. Tape Off
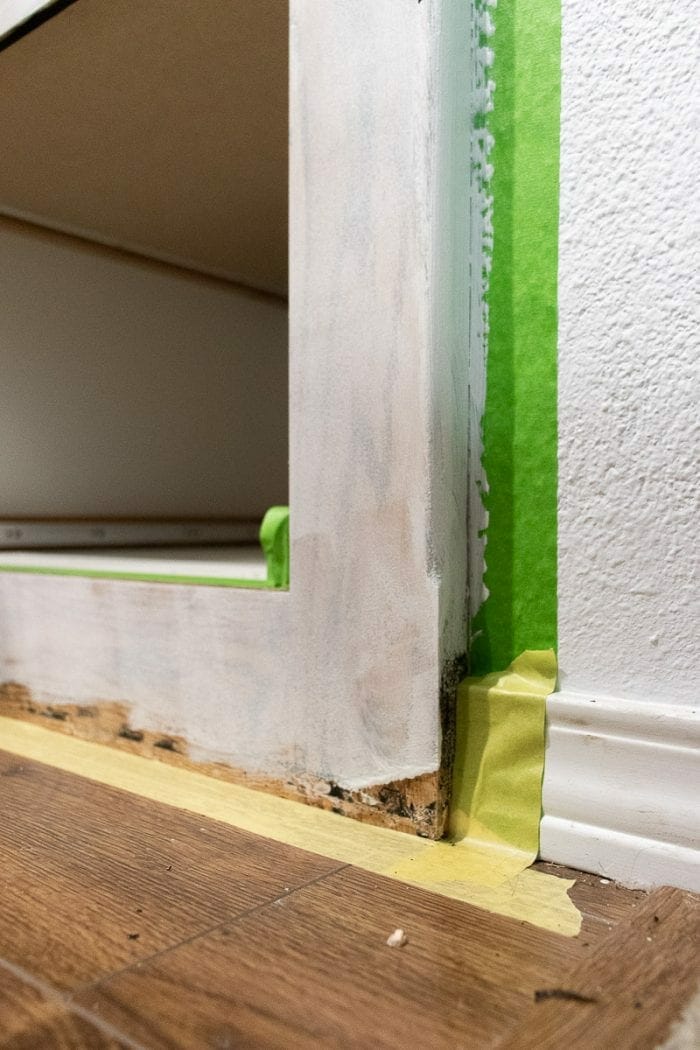
Before you get started with any chemicals, stripping gels or paint, be sure to use FrogTape to protect your walls and surfaces that you want to keep clean. Since refinishing cabinets is a multi-step, multi-day process, we chose to switch out the tape if we were using a new product or if weren’t going to be doing the next coat for at least 12+ hours later.
Be sure to also protect your floors prior to starting work.
2. Strip the Cabinets
So, once the walls and floors were protected we stripped all the cabinets using citristrip, a paint and varnish stripper. We applied it thick using a cheap bristle brush and let the gel sit on the cabinets for around 30 minutes. Then use a cheap plastic scraper to scrape all the stain off. Something like this would work perfect.

If you followed the beginning of our kitchen renovation you know that we used polyshades originally when we stained the cabinets six years ago. It’s like a faux stain and wasn’t holding up well at all.
We didn’t want to just paint over the polyshades because, in the long run, it wouldn’t hold up. Much of the polyshades had already worn off in high used area so we decided to strip the cabinets completely. The whole process, between nap times and evenings when the children weren’t around, took about a week.

If any areas of the cabinets still have visible stain, let it dry completely for at least two hours and then apply more stripping gel and scrape again. Usually one coat will get the majority of the stripping gel, but then you need to go back through to get areas where you may have applied it too thin.
Note that this is a pretty messy project and best to do when kids aren’t around. We found it was easiest to scrap the stain into a metal paint pan to make clean up easier.
3. Sand
After the cabinets were all stripped, sand everything down to make sure you have a clean surface to work with. We used 120 grit on all the cabinet faces.
4. Paint
Next, we did three coats of white bond coat letting it dry at least 3 hours in between each coat. The last coat was a clear top coat that helps protect the finish. The top coat cures really hard and helps the cabinets withstand all the constant use that happens in kitchens.
So, now that you understand the basic process, let me share with you all the tips and tricks I learned from doing our whole kitchen.
Tips for Painting Wood Cabinets
First off, you really want to make sure you have good supplies when you’re painting cabinets. If you’re a Home Depot girl, like myself, click the links below, add them all to your cart, buy, and then you just have to walk in and pick up your stuff within a few hours. You’re in and out in less than five minutes and such a lifesaver when you’ve got kiddos in tow.
What Painting Supplies Do I Need?
- Scotch-brite
- FrogTape multi-surface painter’s tape
- FrogTape delicate surface painter’s tape
- Painter’s plastic
- Sharpie (for labeling hardware)
- Nitrile gloves
- Tack cloths (you need A LOT of them)
- Red Rosin paper
Some of my favorite things that you are going to need is a good Scotch-Brite scrubber, plastic tarps to protect the whole space, and painter’s tape.
The scotch-brite will help get off any high spots or any dust that might land on your surface before you paint the next coat. The plastic sheets will help you protect your space to make sure that there isn’t a lot of air flowing around because any little dust particles are going to get into that space and you’ll notice it, especially if you’re using the white paint as we did. The painter’s tape will save you from needing to do too many touch ups and will help you get clean, straight lines.

I loved using the green and yellow FrogTape®. The green tape is for multi-surfaces. Typically you can use it on walls. The yellow tape is for more delicate surfaces and is better for freshly painted cabinets or to adhere to laminate flooring, which came in really handy when we were painting baseboards. When you’re pulling off FrogTape® make sure and pull it at a sharp angle so that the painted line is really sharp and clean and breaks that seal.
Another really important thing when painting cabinets are to make sure you have a good multi-layered painting strategy. We used the bond coat and the top coat from the Rustoleum cabinet transformations kit.

A few more tips:
When painting drawers, don’t forget to tape off all the edges so that the drawer fronts look nice and clean.
On doors, make sure to remove all the hardware and label it so that you know exactly where it goes back. All of the hardware has been perfectly adjusted to fit the cabinet so save yourself a headache and take the time to label each piece of hardware. I found the best way to do this was a small piece of tape on each piece of hardware with a little code I made up. For example, IRT for Island Right Top or it would be ILB for Island Left Bottom. Make sure you label everything before you remove it all and then you can just put it in a bag and set it aside until you’re ready for it.
If you’re using the same top coat we used, make sure you don’t let any of the top coat pool up in any of the little crevices or corners. Since it’s laying flat, rather than on a vertical surface, if it pools up it’s more likely to turn yellow because there’s a very slight yellow tint to the top coat. A few of the doors were rushed through and I realized later that there was some pooling that turned yellow so I’m going to have to sand and fix that.
In the long run, painting our kitchen cabinets was the best decision we made for our kitchen renovation! It makes such a big impact and makes our space so bright and fresh compared to the dark kitchen we had before.
Check out the before and after of our painted kitchen cabinets!


In case you missed it, check out the full kitchen reveal here for all the details.

If you followed the kitchen reno process, you probably saw green and yellow tape often. We used the FrogTape® every step along the way in our kitchen renovation.
Besides protecting the walls and floors when painting cabinets, we also used it to protect the counters from silicone when installing the sink…


Used it to protect the counters when installing tile…
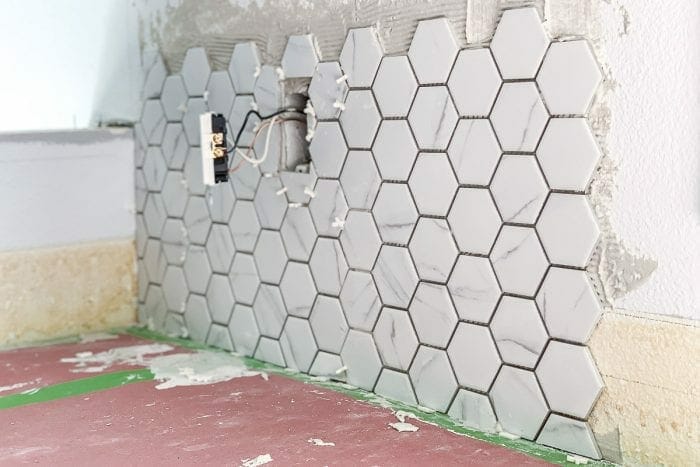
Used it to hold up tile while the thinset dried.

I’m so glad we decided to refinish our cabinets and although it was a lot of work, I would do it again in a heartbeat if I had to. We saved so much money and it made such a huge impact on our kitchen.
I really like the article on painting cabinets. Makes the task seem less daunting than I imagined. Thanks.
What white paint did you use on the cabinets?